


Mastering the Art of V60 Coffee: Your Ultimate Guide on How to Make V60 Coffee Like a Pro
Affiliate disclosure: This article may contain affiliate links. Recommendations are independent and editorially driven.
For many coffee aficionados, the Hario V60 dripper isn’t just a brewing device; it’s a gateway to an elevated coffee experience. Revered for its ability to produce clean, bright, and nuanced cups, the V60 has carved out a significant niche in the world of specialty coffee. Its name, derived from its ‘V’ shape and 60-degree angle, hints at the meticulous design that allows for optimal extraction. Unlike immersion brewing methods, the V60 is a pour-over technique, meaning water passes through the coffee grounds and a filter, carrying the dissolved solids into your cup. This method highlights the intrinsic flavors of high-quality beans, offering a transparency and complexity often sought by connoisseurs.
The journey to mastering how to make V60 coffee is one of precision, patience, and sensory exploration. It’s a rewarding pursuit that transforms your morning routine into a meditative ritual and your cup into a personal masterpiece. While it might seem daunting at first, with a little guidance, practice, and the right tools, anyone can brew an exceptional V60. This comprehensive guide from cafeserre will walk you through every step, from selecting your equipment to fine-tuning your technique, ensuring you unlock the full potential of your coffee beans and enjoy a truly remarkable brew.
We’ll delve into the essential gear, the science behind the extraction, troubleshooting common issues, and even advanced tips to elevate your pour-over game. Whether you’re a seasoned barista or a curious beginner eager to explore the world of specialty coffee, prepare to embark on an enlightening journey that will redefine your understanding of what a truly great cup of coffee can be. Let’s pour over the details and discover the secrets to V60 perfection.
Understanding the Allure of V60 Coffee: Why It Stands Out
The V60 brewing method has garnered a dedicated following worldwide, distinguishing itself from other coffee preparation techniques through several key characteristics. Its unique design and the resulting flavor profile are at the heart of its popularity, offering an experience that is both elegant and deeply satisfying.
The Distinctive Flavor Profile: Clarity and Nuance
One of the primary reasons coffee enthusiasts gravitate towards the V60 is its unparalleled ability to produce a clean, crisp, and incredibly nuanced cup. Unlike French press, which often results in a full-bodied brew with some sediment, or espresso, which is concentrated and intense, V60 coffee emphasizes clarity. This means that the individual flavor notes of the coffee beans – be it fruity, floral, nutty, or chocolaty – are presented with remarkable precision. The method effectively filters out fine particulates and oils, allowing the delicate aromatics and bright acidity to shine through.
- Brightness: V60 often highlights the inherent acidity of coffee beans, presenting it as a pleasant, sparkling quality rather than an aggressive sourness.
- Sweetness: When brewed correctly, V60 can extract a beautiful, natural sweetness from the coffee, balancing its acidity and contributing to a well-rounded flavor.
- Complexity: The transparency of the brew allows for the appreciation of multiple layers of flavor, revealing the intricate profile developed during the coffee’s growth and processing.
The Art of Pour-Over: A Meditative Experience
Beyond the taste, the act of brewing coffee with a V60 is an experience in itself. It’s a manual process that requires attention, precision, and a bit of artistry, transforming a simple morning routine into a mindful ritual. The controlled pouring, the visual spectacle of the bloom, and the gentle drip of the brewed coffee create a connection between the brewer and the beverage that automated machines simply cannot replicate.
- Control: The V60 grants the brewer immense control over every variable – water temperature, grind size, pour rate, and total brew time. This level of control empowers you to tailor the coffee exactly to your preference and experiment with different parameters.
- Engagement: The hands-on nature encourages engagement with the coffee itself. You learn to appreciate the aroma of fresh grounds, the visual changes during extraction, and the subtle sounds of the brewing process.
- Ritual: For many, the V60 pour-over becomes a daily ritual, a quiet moment of focus and enjoyment before the day truly begins.
Versatility and Customization
The V60 is surprisingly versatile. While there are generally accepted best practices, there’s also ample room for experimentation and personal preference. Different pour patterns, bloom durations, and water temperatures can yield dramatically different results from the same beans. This makes the V60 an ideal tool for exploring the vast world of coffee flavors and finding your perfect cup.
- Bean Compatibility: The V60 truly excels with light to medium roast single-origin coffees, where its ability to highlight distinct characteristics is most evident. However, it can also produce delightful results with many blends.
- Scalability: While most commonly used for single servings, larger V60 models can brew multiple cups, making it suitable for both individual enjoyment and serving guests.
In essence, the V60 offers a journey into the intricate world of coffee, rewarding the diligent brewer with a cup that is not just a beverage, but an experience – clear, expressive, and deeply satisfying.
Essential Gear for V60 Brewing: What You Need to Get Started

To embark on your V60 brewing journey, having the right equipment is just as important as having quality coffee beans. Each piece plays a crucial role in achieving that perfect, nuanced cup. Investing in good tools will elevate your brewing experience and consistency.


The V60 Dripper: Material Matters
The V60 dripper itself is a cone-shaped device with a large single hole at the bottom and spiral ridges on the interior walls. These ridges are crucial for allowing air to escape during brewing and ensuring a smooth flow of water.
- Ceramic: Often considered the classic choice, ceramic drippers offer excellent heat retention, which is vital for stable brewing temperatures. They are also aesthetically pleasing and durable, though prone to breaking if dropped.
- Plastic: Lightweight, durable, and the most affordable option, plastic V60s are surprisingly good performers. They don’t retain as much heat as ceramic but are quick to heat up and maintain temperature well during the pour. Ideal for travel or beginners.
- Glass: Combines the visual appeal of ceramic with good heat retention, though perhaps slightly less robust. They allow you to watch the extraction process, which is a nice touch.
- Metal (e.g., Stainless Steel, Copper): Known for superior heat retention and durability. Metal drippers are virtually unbreakable and can be a premium choice for serious brewers, often with a higher price tag.
While the material subtly affects heat retention, the fundamental design remains the same across all versions. The most important choice here is often budget and aesthetic preference.
V60 Paper Filters: The Key to Clarity
Hario V60 filters are unique to the V60 dripper and are critical for the clean taste profile. They are cone-shaped, unbleached or bleached, and thicker than typical basket filters. Always use genuine Hario V60 filters (sized 01, 02, or 03 corresponding to your dripper size) for the best results.
- Bleached vs. Unbleached: Bleached filters undergo a process to remove woody flavors, resulting in a cleaner taste. While some argue that unbleached filters impart a papery taste, a thorough pre-rinse mitigates this significantly for both types.
Coffee Grinder: Consistency is King
A good grinder is arguably the most important piece of equipment after the coffee itself. Pre-ground coffee loses freshness rapidly, and inconsistent grind sizes lead to uneven extraction, resulting in either a sour (underextracted) or bitter (overextracted) cup.
- Burr Grinder (Conical or Flat): Essential for consistent grind size. Blade grinders “chop” coffee unevenly, creating too many fines and boulders. Invest in a quality burr grinder, either manual (hand grinder) or electric.
- Grind Size for V60: Generally, a medium-fine grind, resembling table salt or sand, is recommended for V60. You’ll adjust this based on your specific beans and desired brew time.
Discover the best coffee grinders for home brewing.
Gooseneck Kettle: Precision Pouring
A gooseneck kettle, with its long, slender spout, provides exceptional control over the water flow. This precision is vital for pour-over brewing, allowing you to evenly saturate the grounds and control your pour rate, which directly impacts extraction.
- Stovetop vs. Electric: Electric gooseneck kettles often come with temperature control, allowing you to set the exact desired water temperature, which is a huge advantage for consistency. Stovetop versions are more budget-friendly but require a thermometer.
Digital Scale with Timer: Accuracy and Repeatability
Coffee brewing is a science, and precision is paramount. A digital scale allows you to accurately measure your coffee grounds and water by weight, not volume. This eliminates variability and ensures you can replicate your best brews.
- Integrated Timer: Many coffee scales include a built-in timer, which is incredibly useful for tracking bloom time and total brew time, helping you hit your target extraction window.
Coffee Server (Carafe): Collecting Your Brew
A simple glass server, or carafe, is used to collect your freshly brewed coffee. While not essential (you can brew directly into a mug), a server allows for better temperature retention, easier swirling to mix the coffee, and is necessary if brewing for multiple servings.
- Material: Glass is common, but insulated servers are also available to keep your coffee warmer for longer.
Thermometer (Optional but Recommended)
If you don’t have an electric kettle with temperature control, a thermometer is essential for checking your water temperature. Consistency in water temperature is crucial for consistent extraction.
Here’s a comparison of popular V60 dripper materials to help you decide:
| Dripper Material | Pros | Cons | Best For |
|---|---|---|---|
| Plastic (Polypropylene) | Lightweight, durable, affordable, excellent heat transfer. | Perceived lower aesthetic value, can stain over time. | Travel, beginners, budget-conscious brewers. |
| Ceramic | Excellent heat retention, beautiful aesthetics, classic feel. | Fragile (prone to chipping/breaking), heavier, takes longer to preheat. | Home brewing, aesthetic appeal, stable temperature. |
| Glass | Good heat retention, elegant appearance, allows visual of brewing. | Fragile, can be more expensive than plastic. | Home brewing, visual appeal, good temperature stability. |
| Metal (Stainless Steel/Copper) | Extremely durable, superior heat retention (especially copper), sleek modern look. | Highest price point, can get very hot to touch (copper). | Long-term investment, durability, optimal temperature stability. |
| Arita-yaki Porcelain | Premium ceramic, often handcrafted, exceptional heat retention. | Very expensive, highly fragile, collector’s item. | Connoisseurs, those seeking artisanal quality and peak performance. |
Selecting the Right Coffee Beans: The Foundation of Flavor
The quality of your coffee beans is the single most important factor influencing the taste of your V60 brew. Even with the best equipment and technique, subpar beans will yield a subpar cup. Conversely, exceptional beans, properly prepared, can transport you to new sensory heights.
Freshness is Non-Negotiable
Coffee is an agricultural product, and like fresh produce, its quality degrades over time. Once roasted, coffee beans begin to degas and oxidize, losing their volatile aromatics and flavors. For V60, where clarity and nuance are paramount, freshness is absolutely crucial.
- Roast Date: Always look for coffee with a “roasted on” date, not a “best by” date. Ideally, coffee for pour-over should be brewed between 5-21 days post-roast. This allows time for degassing (CO2 release, which can hinder extraction) while still retaining peak freshness.
- Storage: Store whole beans in an airtight container, away from light, heat, and moisture. Avoid the refrigerator or freezer for daily use, as temperature fluctuations can cause condensation and accelerate staling.
- Whole Beans vs. Pre-ground: Always buy whole beans and grind them just before brewing. Pre-ground coffee stales exponentially faster due to the increased surface area exposed to oxygen.
Origin and Varietal: A World of Flavors
The origin of your coffee beans plays a massive role in their inherent flavor characteristics. Different regions, altitudes, and processing methods yield distinct profiles.
- African Coffees (e.g., Ethiopia, Kenya, Rwanda): Often known for bright acidity, floral notes, citrus, berry, and tea-like qualities. Excellent for V60 due to their inherent complexity and clarity.
- Central and South American Coffees (e.g., Colombia, Costa Rica, Guatemala): Tend to be more balanced, with notes of chocolate, nuts, caramel, and stone fruit. Can still be fantastic in a V60, offering a sweeter, rounder cup.
- Asian Coffees (e.g., Indonesia, Vietnam): Often have heavier body, earthy, spicy, or savory notes. While not traditionally associated with V60’s clarity, some lighter roasted Asian coffees can offer unique experiences.
Exploring different varietals (e.g., Gesha, Typica, Bourbon, Caturra) within these regions can further refine your preference, as each has its own genetic predispositions for flavor.
Roast Level: Tailoring to V60
For V60 brewing, light to medium roasts are generally preferred. These roasts preserve the delicate, intrinsic flavors of the bean that the V60 is designed to highlight.
- Light Roasts: Often have higher acidity, more pronounced floral and fruity notes. They require precise brewing temperatures and grind sizes due to their density.
- Medium Roasts: Offer a balance of sweetness, body, and acidity. A great starting point for V60 beginners, as they are more forgiving to brew.
- Dark Roasts: While delicious in other brewing methods (like French Press or espresso for certain profiles), dark roasts can taste bitter or smoky in a V60 due to over-extraction of roast-derived flavors. They often lack the nuanced clarity that the V60 excels at showcasing.
Grind Size: The Critical Factor
Even with the freshest, most exquisite beans, an incorrect grind size will ruin your V60. The ideal grind for V60 is typically medium-fine, resembling coarse sand or table salt.
- Too Fine: Leads to over-extraction (bitterness, astringency, slow drawdown time). The water struggles to pass through, dissolving too many soluble compounds.
- Too Coarse: Leads to under-extraction (sourness, weak body, fast drawdown time). The water passes too quickly, not dissolving enough of the desirable compounds.
- Adjusting Grind: Your grind size will be one of the primary variables you adjust to fine-tune your brew time and taste. If your brew is too fast and sour, grind finer. If it’s too slow and bitter, grind coarser.
Investing time in finding a reputable local roaster or a specialty online retailer can dramatically improve your V60 results. Don’t be afraid to ask questions about their beans, roast dates, and recommendations for pour-over. A well-sourced, freshly roasted bean is the cornerstone of any great V60 coffee.
The Science Behind V60 Brewing: Understanding Extraction Dynamics

Brewing coffee, especially with a method as precise as the V60, is as much an art as it is a science. Understanding the fundamental principles of extraction will empower you to make informed decisions during your brew, leading to more consistent and delicious results.

Solubility and Extraction: What We’re Taking Out
Coffee beans contain thousands of chemical compounds, and when hot water comes into contact with ground coffee, some of these compounds dissolve and are carried into your cup. This process is called extraction. Not all compounds extract at the same rate or contribute positively to flavor.
- Desirable Compounds: These include acids (contributing brightness), sugars (sweetness), and some bitter compounds that add complexity in moderation. They extract relatively early in the brewing process.
- Undesirable Compounds: Primarily highly bitter, astringent compounds (like plant fibers). These extract later in the brewing process.
- The Goal: The aim is to extract the desirable compounds while avoiding, or minimizing, the extraction of undesirable ones. This is typically achieved when 18-22% of the coffee’s dry mass has dissolved into the water.
Key Variables Affecting Extraction:
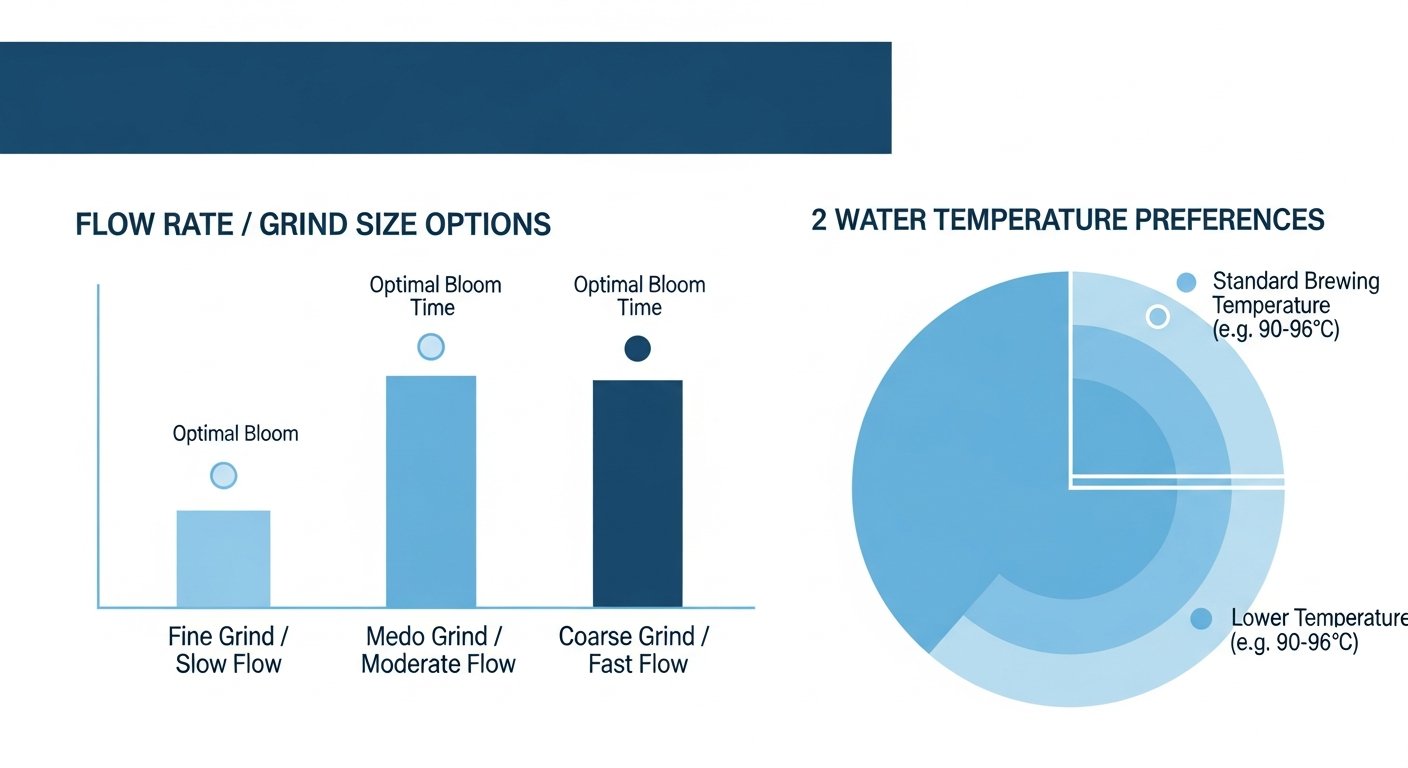
1. Water Temperature
Temperature significantly impacts the rate and efficiency of extraction. Hotter water dissolves compounds faster and more effectively.
- Ideal Range: Generally between 195°F and 205°F (90.5°C to 96°C).
- Too Cold: Leads to under-extraction, resulting in a sour, thin, and weak cup. The water doesn’t have enough energy to dissolve enough compounds.
- Too Hot: Can lead to over-extraction, resulting in a bitter, astringent, and harsh cup. It can also scorch the coffee, introducing undesirable flavors.
- Practical Tip: If using a stovetop kettle, bring water to a boil, then let it sit for 30-60 seconds before pouring. For electric kettles, set to your desired temperature.
2. Grind Size and Surface Area
The finer the grind, the more surface area of the coffee is exposed to water, leading to faster extraction. This is a critical variable to dial in.
- Medium-Fine: This is the starting point for V60. It provides enough surface area for efficient extraction within a reasonable brew time (typically 2:30-3:30 minutes for a 300g brew).
- Finer Grind: Increases surface area, speeds up extraction, and slows down water flow (due to increased resistance). Use to increase extraction if your coffee tastes sour or weak.
- Coarser Grind: Decreases surface area, slows down extraction, and speeds up water flow. Use to decrease extraction if your coffee tastes bitter or astringent.
Explore advanced techniques for adjusting your coffee grind.
3. Water-to-Coffee Ratio
This ratio dictates the strength of your coffee. It’s often expressed as parts water to parts coffee (e.g., 1:15 or 1:16).
- Recommended Range: For V60, a common starting point is 1:15 to 1:17. This means for every 1 gram of coffee, you use 15 to 17 grams of water.
- Higher Ratio (more water per coffee, e.g., 1:17): Produces a lighter-bodied, potentially weaker cup if extraction isn’t sufficient.
- Lower Ratio (less water per coffee, e.g., 1:14): Produces a stronger, more concentrated cup.
- Example: For a 300ml (300g) brew, you would use 20g of coffee (300/15 = 20g).
4. Turbulence and Agitation (Pouring Technique)
How you pour the water significantly affects how evenly the coffee grounds are saturated and agitated, which in turn influences extraction.
- Initial Bloom: A small initial pour to saturate all grounds and allow for degassing (release of CO2). This causes the coffee bed to “bloom” or rise. Proper bloom ensures even saturation for subsequent pours.
- Consistent Pouring: A steady, controlled pour (using a gooseneck kettle) ensures even contact between water and coffee. Erratic pouring can create channels, leading to uneven extraction.
- Pour Patterns: Common patterns include concentric circles, starting from the center and spiraling outwards, then back in. This ensures all grounds receive fresh water.
5. Contact Time (Brew Time)
The total time water is in contact with the coffee grounds. This is a cumulative result of grind size, water temperature, and pour rate.
- Target Range: For a standard V60 (e.g., 300g water, 20g coffee), a total brew time of 2:30 to 3:30 minutes is often a good target.
- Too Short: Indicates under-extraction (too coarse grind, too fast pour).
- Too Long: Indicates over-extraction (too fine grind, too slow pour, too much turbulence).
By understanding and meticulously controlling these variables, you can manipulate the extraction process to consistently produce V60 coffee that truly sings with flavor and complexity. Experimentation within these parameters is key to finding your perfect brew.
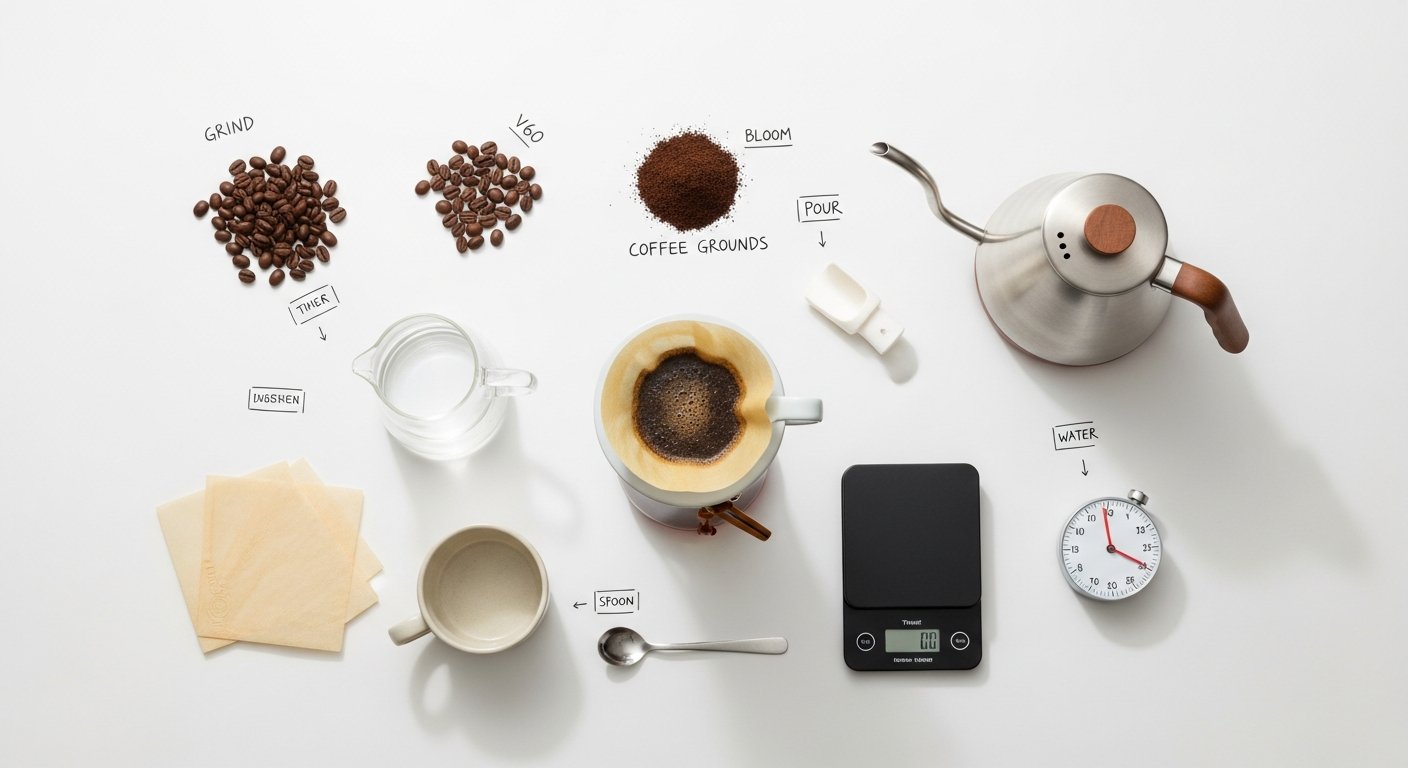
Step-by-Step Guide: How to Make V60 Coffee Like a Pro
Now that you understand the equipment and the science, it’s time to put it all into practice. This step-by-step guide will walk you through brewing a delicious V60 coffee, focusing on precision and consistency. For this guide, we’ll assume a 1:15 ratio, aiming for a 300g brew (300ml water) using 20g of coffee.
Step 1: Gather Your Gear and Heat Your Water
- Equipment: V60 dripper (size 02 for 300ml), V60 paper filter, gooseneck kettle, digital scale with timer, coffee server, fresh coffee beans (20g), burr grinder.
- Heat Water: Fill your gooseneck kettle with fresh, filtered water. Heat it to your desired temperature, typically between 195°F and 205°F (90.5°C to 96°C). If you don’t have temperature control, bring water to a boil and let it cool for about 30-60 seconds.
Step 2: Prepare Your Dripper and Filter
- Place Filter: Place a V60 paper filter into the dripper.
- Rinse Filter: Place the dripper (with filter) on top of your coffee server (or mug) on the digital scale. Pour some of your hot water (around 50-100g) over the filter, thoroughly rinsing it. This removes any papery taste and preheats the dripper and server, ensuring a stable brewing temperature.
- Discard Water: Carefully discard the rinse water from the server.
- Set Up Scale: Place the dripper and server back on the scale and tare it to zero.
Step 3: Grind Your Coffee
- Measure Beans: Measure 20 grams of whole coffee beans using your scale.
- Grind: Grind the beans to a medium-fine consistency, resembling coarse sand or table salt. Adjust as needed based on your grinder and desired brew time.
- Add to Dripper: Transfer the freshly ground coffee into the rinsed filter, gently shaking the dripper to level the coffee bed.
- Tare Again: Tare the scale to zero again.
Step 4: The Bloom (0:00 – 0:45 seconds)
- Start Timer: Start your timer immediately as you begin pouring.
- First Pour (Bloom): Gently pour about 40-50 grams of hot water (roughly twice the weight of your coffee grounds) in a circular motion, ensuring all the grounds are evenly saturated. Aim for the entire surface to be wet.
- Wait: Allow the coffee to “bloom” for 30-45 seconds. During this time, CO2 escapes from the grounds, preparing them for optimal extraction. You’ll see the coffee bed expand and bubble.
Step 5: The Main Pours (0:45 – 2:30 minutes)
After the bloom, you’ll continue pouring in stages, typically in 2-3 additional pours, aiming for a consistent flow and even saturation. The total amount of water for our 1:15 ratio is 300g (20g coffee x 15).
- Second Pour (0:45 – 1:15): After the bloom, start your second pour. Slowly and steadily pour water in concentric circles, moving from the center outwards and then back inwards, avoiding pouring directly onto the filter paper. Aim to reach approximately 120-150g total water by 1:15-1:30 mark. Maintain a consistent water level without letting the coffee bed dry out.
- Third Pour (1:30 – 2:00): Continue pouring, using the same circular motion, aiming to reach approximately 220-250g total water by the 2:00-2:15 mark. Keep the pour steady and controlled.
- Final Pour (2:15 – 2:30): Make your final pour, bringing the total water weight to 300g. Distribute the water evenly to ensure all grounds are fully extracted.
Step 6: The Drawdown (2:30 – 3:30 minutes)
- Allow to Drain: Once you’ve reached your target water weight (300g), stop pouring. Let the remaining water drain through the coffee bed.
- Total Brew Time: Your target total brew time (from the start of the bloom to when the last drips fall) should ideally be between 2 minutes 30 seconds and 3 minutes 30 seconds for a 300g brew.
Step 7: Serve and Enjoy
- Remove Dripper: Once the water has fully drained, remove the V60 dripper and discard the filter and spent grounds.
- Swirl and Serve: Gently swirl the server to homogenize the coffee. Pour into your favorite mug.
- Taste and Adjust: Take a moment to savor your creation. Note the aroma, body, and flavor. This sensory feedback is crucial for making future adjustments to your grind size, temperature, or pour technique.
Remember, practice makes perfect. Don’t be discouraged if your first few brews aren’t exactly what you hoped for. Each brew is an opportunity to learn and refine your craft. Enjoy the process!
Troubleshooting Common V60 Brewing Issues: Diagnosing Your Brew
Even with the best instructions, brewing V60 coffee can sometimes present challenges. The beauty of pour-over lies in its precision, but this also means small errors can have noticeable impacts on your final cup. Learning to identify common issues and how to fix them is a crucial skill for any V60 enthusiast.
Issue 1: The Coffee Tastes Sour, Weak, or Under-Extracted
This is a very common issue, often resulting in a thin body, sharp acidity that isn’t pleasant, and a lack of sweetness or developed flavors.
- Diagnosis:
- Taste: Sour, tangy, grassy, weak, watery, lacking body, thin mouthfeel.
- Brew Time: Often too fast (e.g., significantly under 2:30 for a 300g brew).
- Solutions:
- Grind Finer: This is usually the first adjustment. A finer grind increases the surface area for extraction and slows down the water flow, allowing for more contact time. Adjust your grinder by one notch finer and re-brew.
- Increase Water Temperature: Ensure your water is hot enough (195-205°F / 90.5-96°C). Colder water extracts less efficiently.
- Increase Contact Time: If your grind is already fine enough, try pouring slower or increasing your bloom time slightly to increase overall contact time.
- Ensure Even Saturation: Make sure all grounds are thoroughly wet during the bloom and subsequent pours. Dry spots (donut extractions) lead to under-extraction.
- Check Coffee-to-Water Ratio: If your coffee is too weak, you might be using too much water for your amount of coffee. Try a slightly lower ratio (e.g., 1:14 instead of 1:15).
Issue 2: The Coffee Tastes Bitter, Harsh, or Over-Extracted
A bitter cup is characterized by an unpleasant, often acrid or burnt taste, sometimes accompanied by a dry, chalky, or astringent sensation in the mouth.
- Diagnosis:
- Taste: Bitter, burnt, astringent (drying sensation on the tongue), hollow, strong, overwhelming.
- Brew Time: Often too slow (e.g., significantly over 3:30 for a 300g brew).
- Solutions:
- Grind Coarser: This is the primary fix. A coarser grind reduces surface area and speeds up water flow, decreasing contact time and preventing the extraction of undesirable bitter compounds.
- Decrease Water Temperature: If your water is too hot, it can quickly over-extract. Try reducing the temperature by a few degrees.
- Decrease Contact Time/Pour Faster: If your grind is already appropriate, try pouring a bit faster to reduce the total brew time.
- Reduce Agitation: Pouring too aggressively or stirring the coffee bed excessively can lead to over-extraction. Keep your pours gentle and controlled.
- Check Coffee Quality: Very dark roasts are prone to bitterness, especially in a V60. Ensure you’re using fresh, quality beans appropriate for pour-over.
Issue 3: Inconsistent Brews or Uneven Extraction
You might notice some brews are great, others not so much, or your coffee tastes simultaneously sour AND bitter (a sign of uneven extraction).
- Diagnosis:
- Taste: A mix of undesirable flavors (sour and bitter), hollow, complex but in a bad way.
- Coffee Bed: Can look uneven, with craters or dry patches after brewing.
- Drawdown: Water might channel unevenly.
- Solutions:
- Improve Grind Consistency: A high-quality burr grinder is paramount. Inconsistent grind sizes (fines and boulders) lead to both under and over-extraction occurring simultaneously.
- Even Bloom: Ensure your bloom pour saturates all grounds evenly. Gently swirl the dripper after the bloom to ensure a flat bed.
- Consistent Pouring: Use your gooseneck kettle to pour in slow, steady, concentric circles, ensuring fresh water hits all parts of the coffee bed. Avoid pouring too close to the edges of the filter.
- Level Coffee Bed: After grinding, gently tap or shake the dripper to level the coffee bed before blooming. This promotes even water flow.
- Pre-wet Filter and Dripper: Always pre-rinse your filter and preheat your dripper and server to maintain stable temperatures and consistent flow.
The key to troubleshooting is to change one variable at a time. Start with grind size, as it often has the most dramatic impact. Keep a brewing log to track your parameters (coffee weight, water weight, grind setting, water temperature, brew time) and tasting notes. This systematic approach will help you quickly identify what works and what doesn’t, leading you towards consistently excellent V60 coffee.
Advanced V60 Techniques & Customization: Elevating Your Brew
Once you’ve mastered the fundamentals of how to make V60 coffee, you might find yourself craving more control, exploring different flavor nuances, and pushing the boundaries of what your dripper can achieve. This is where advanced techniques and customization come into play, allowing you to fine-tune your extraction to an even greater degree.
Experimenting with Pour Patterns and Flow Rates
While the standard circular pour is a great starting point, experienced brewers often manipulate their pour patterns and flow rates to achieve specific results.
- Pulsed Pours: Instead of continuous pours, some methods advocate for multiple, smaller pulses of water. This allows for greater control over agitation and contact time, potentially extracting more sweetness or clarity. For example, a 4-pour method (bloom + 3 main pours) with pauses in between can create different extraction dynamics than a continuous pour.
- Central Pours: Focusing more water towards the center of the coffee bed and less towards the edges can help prevent channeling and ensure a more even extraction, especially with finer grinds. This minimizes water flowing too quickly down the sides.
- Aggressive vs. Gentle Agitation: A more aggressive pour (faster, higher stream) creates more turbulence, increasing extraction. A gentler, slower pour reduces agitation, which can be desirable for very fine grinds or to reduce bitterness. Adjusting the height of your kettle during pouring also affects agitation.
Optimizing Your Bloom
The bloom is critical, and there are ways to optimize it beyond just saturating the grounds.
- Bloom Stir: After your initial bloom pour, gently stir the coffee bed with a small spoon or stir stick. This ensures all grounds are completely saturated and breaks up any dry clumps, leading to a more even extraction. Be gentle, as too much agitation here can prematurely extract bitterness.
- Extended Bloom: While 30-45 seconds is standard, some recipes call for a longer bloom (up to 60 seconds or more), especially for very fresh coffee or denser beans. This allows more CO2 to escape, reducing sourness and promoting sweetness in the final cup.
Preheating Strategies
Maintaining stable temperature throughout the brew is paramount. Beyond simply rinsing the filter, consider these extra steps:
- Preheat the Server: Ensure your coffee server is thoroughly preheated with hot water before placing the dripper on it. This minimizes heat loss from the brewed coffee.
- Insulation: For colder environments, consider wrapping your dripper and server with a towel during brewing to maintain temperature. Some brewers even use heat-retaining dripper stands.
Exploring Different V60 Recipes
The V60 community has developed numerous recipes, often named after famous baristas or coffee personalities. These recipes typically vary in:
- Ratio: From 1:13 for a stronger brew to 1:17 or 1:18 for a lighter, more delicate cup.
- Grind Size: Recipes might specify finer or coarser grinds than standard.
- Water Temperature: Some advocate for lower temperatures to highlight acidity, others for higher for body.
- Pour Schedule: The timing and volume of each pour are meticulously detailed.
Examples of popular recipes include James Hoffmann’s ultimate V60 technique, which emphasizes multiple small pours and a gentle swirl, or various competition-winning recipes that push the boundaries of extraction. Experimenting with these can reveal new dimensions in your coffee.
Water Chemistry: The Unsung Hero
While often overlooked, the quality and mineral content of your water have a profound impact on coffee flavor.
- Filtered Water: Always use filtered water, free from chlorine and excessive minerals, which can impart off-flavors.
- Specific Mineral Content: For truly advanced brewing, some enthusiasts use specific “brew water” with precise mineral compositions designed to optimize extraction and flavor. This can involve adding minerals like magnesium and calcium to distilled water. Companies like Third Wave Water offer convenient packets for this purpose.
Mastering the Art of V60 Coffee: Your Ultimate Guide on How to Make V60 Coffee Like a Pro
Affiliate disclosure: This article may contain affiliate links. Recommendations are independent and editorially driven.
For many coffee aficionados, the Hario V60 dripper isn’t just a brewing device; it’s a gateway to an elevated coffee experience. Revered for its ability to produce clean, bright, and nuanced cups, the V60 has carved out a significant niche in the world of specialty coffee. Its name, derived from its ‘V’ shape and 60-degree angle, hints at the meticulous design that allows for optimal extraction. Unlike immersion brewing methods, the V60 is a pour-over technique, meaning water passes through the coffee grounds and a filter, carrying the dissolved solids into your cup. This method highlights the intrinsic flavors of high-quality beans, offering a transparency and complexity often sought by connoisseurs.
The journey to mastering how to make V60 coffee is one of precision, patience, and sensory exploration. It’s a rewarding pursuit that transforms your morning routine into a meditative ritual and your cup into a personal masterpiece. While it might seem daunting at first, with a little guidance, practice, and the right tools, anyone can brew an exceptional V60. This comprehensive guide from cafeserre will walk you through every step, from selecting your equipment to fine-tuning your technique, ensuring you unlock the full potential of your coffee beans and enjoy a truly remarkable brew.
We’ll delve into the essential gear, the science behind the extraction, troubleshooting common issues, and even advanced tips to elevate your pour-over game. Whether you’re a seasoned barista or a curious beginner eager to explore the world of specialty coffee, prepare to embark on an enlightening journey that will redefine your understanding of what a truly great cup of coffee can be. Let’s pour over the details and discover the secrets to V60 perfection.
Understanding the Allure of V60 Coffee: Why It Stands Out
The V60 brewing method has garnered a dedicated following worldwide, distinguishing itself from other coffee preparation techniques through several key characteristics. Its unique design and the resulting flavor profile are at the heart of its popularity, offering an experience that is both elegant and deeply satisfying.
The Distinctive Flavor Profile: Clarity and Nuance
One of the primary reasons coffee enthusiasts gravitate towards the V60 is its unparalleled ability to produce a clean, crisp, and incredibly nuanced cup. Unlike French press, which often results in a full-bodied brew with some sediment, or espresso, which is concentrated and intense, V60 coffee emphasizes clarity. This means that the individual flavor notes of the coffee beans – be it fruity, floral, nutty, or chocolaty – are presented with remarkable precision. The method effectively filters out fine particulates and oils, allowing the delicate aromatics and bright acidity to shine through.
- Brightness: V60 often highlights the inherent acidity of coffee beans, presenting it as a pleasant, sparkling quality rather than an aggressive sourness.
- Sweetness: When brewed correctly, V60 can extract a beautiful, natural sweetness from the coffee, balancing its acidity and contributing to a well-rounded flavor.
- Complexity: The transparency of the brew allows for the appreciation of multiple layers of flavor, revealing the intricate profile developed during the coffee’s growth and processing.
The Art of Pour-Over: A Meditative Experience
Beyond the taste, the act of brewing coffee with a V60 is an experience in itself. It’s a manual process that requires attention, precision, and a bit of artistry, transforming a simple morning routine into a mindful ritual. The controlled pouring, the visual spectacle of the bloom, and the gentle drip of the brewed coffee create a connection between the brewer and the beverage that automated machines simply cannot replicate.
- Control: The V60 grants the brewer immense control over every variable – water temperature, grind size, pour rate, and total brew time. This level of control empowers you to tailor the coffee exactly to your preference and experiment with different parameters.
- Engagement: The hands-on nature encourages engagement with the coffee itself. You learn to appreciate the aroma of fresh grounds, the visual changes during extraction, and the subtle sounds of the brewing process.
- Ritual: For many, the V60 pour-over becomes a daily ritual, a quiet moment of focus and enjoyment before the day truly begins.
Versatility and Customization
The V60 is surprisingly versatile. While there are generally accepted best practices, there’s also ample room for experimentation and personal preference. Different pour patterns, bloom durations, and water temperatures can yield dramatically different results from the same beans. This makes the V60 an ideal tool for exploring the vast world of coffee flavors and finding your perfect cup.
- Bean Compatibility: The V60 truly excels with light to medium roast single-origin coffees, where its ability to highlight distinct characteristics is most evident. However, it can also produce delightful results with many blends.
- Scalability: While most commonly used for single servings, larger V60 models can brew multiple cups, making it suitable for both individual enjoyment and serving guests.
In essence, the V60 offers a journey into the intricate world of coffee, rewarding the diligent brewer with a cup that is not just a beverage, but an experience – clear, expressive, and deeply satisfying.
Essential Gear for V60 Brewing: What You Need to Get Started
To embark on your V60 brewing journey, having the right equipment is just as important as having quality coffee beans. Each piece plays a crucial role in achieving that perfect, nuanced cup. Investing in good tools will elevate your brewing experience and consistency.
The V60 Dripper: Material Matters
The V60 dripper itself is a cone-shaped device with a large single hole at the bottom and spiral ridges on the interior walls. These ridges are crucial for allowing air to escape during brewing and ensuring a smooth flow of water.
- Ceramic: Often considered the classic choice, ceramic drippers offer excellent heat retention, which is vital for stable brewing temperatures. They are also aesthetically pleasing and durable, though prone to breaking if dropped.
- Plastic: Lightweight, durable, and the most affordable option, plastic V60s are surprisingly good performers. They don’t retain as much heat as ceramic but are quick to heat up and maintain temperature well during the pour. Ideal for travel or beginners.
- Glass: Combines the visual appeal of ceramic with good heat retention, though perhaps slightly less robust. They allow you to watch the extraction process, which is a nice touch.
- Metal (e.g., Stainless Steel, Copper): Known for superior heat retention and durability. Metal drippers are virtually unbreakable and can be a premium choice for serious brewers, often with a higher price tag.
While the material subtly affects heat retention, the fundamental design remains the same across all versions. The most important choice here is often budget and aesthetic preference.
V60 Paper Filters: The Key to Clarity
Hario V60 filters are unique to the V60 dripper and are critical for the clean taste profile. They are cone-shaped, unbleached or bleached, and thicker than typical basket filters. Always use genuine Hario V60 filters (sized 01, 02, or 03 corresponding to your dripper size) for the best results.
- Bleached vs. Unbleached: Bleached filters undergo a process to remove woody flavors, resulting in a cleaner taste. While some argue that unbleached filters impart a papery taste, a thorough pre-rinse mitigates this significantly for both types.
Coffee Grinder: Consistency is King
A good grinder is arguably the most important piece of equipment after the coffee itself. Pre-ground coffee loses freshness rapidly, and inconsistent grind sizes lead to uneven extraction, resulting in either a sour (underextracted) or bitter (overextracted) cup.
- Burr Grinder (Conical or Flat): Essential for consistent grind size. Blade grinders “chop” coffee unevenly, creating too many fines and boulders. Invest in a quality burr grinder, either manual (hand grinder) or electric.
- Grind Size for V60: Generally, a medium-fine grind, resembling table salt or sand, is recommended for V60. You’ll adjust this based on your specific beans and desired brew time.
Discover the best coffee grinders for home brewing.
Gooseneck Kettle: Precision Pouring
A gooseneck kettle, with its long, slender spout, provides exceptional control over the water flow. This precision is vital for pour-over brewing, allowing you to evenly saturate the grounds and control your pour rate, which directly impacts extraction.
- Stovetop vs. Electric: Electric gooseneck kettles often come with temperature control, allowing you to set the exact desired water temperature, which is a huge advantage for consistency. Stovetop versions are more budget-friendly but require a thermometer.
Digital Scale with Timer: Accuracy and Repeatability
Coffee brewing is a science, and precision is paramount. A digital scale allows you to accurately measure your coffee grounds and water by weight, not volume. This eliminates variability and ensures you can replicate your best brews.
- Integrated Timer: Many coffee scales include a built-in timer, which is incredibly useful for tracking bloom time and total brew time, helping you hit your target extraction window.
Coffee Server (Carafe): Collecting Your Brew
A simple glass server, or carafe, is used to collect your freshly brewed coffee. While not essential (you can brew directly into a mug), a server allows for better temperature retention, easier swirling to mix the coffee, and is necessary if brewing for multiple servings.
- Material: Glass is common, but insulated servers are also available to keep your coffee warmer for longer.
Thermometer (Optional but Recommended)
If you don’t have an electric kettle with temperature control, a thermometer is essential for checking your water temperature. Consistency in water temperature is crucial for consistent extraction.
Here’s a comparison of popular V60 dripper materials to help you decide:
| Dripper Material | Pros | Cons | Best For |
|---|---|---|---|
| Plastic (Polypropylene) | Lightweight, durable, affordable, excellent heat transfer. | Perceived lower aesthetic value, can stain over time. | Travel, beginners, budget-conscious brewers. |
| Ceramic | Excellent heat retention, beautiful aesthetics, classic feel. | Fragile (prone to chipping/breaking), heavier, takes longer to preheat. | Home brewing, aesthetic appeal, stable temperature. |
| Glass | Good heat retention, elegant appearance, allows visual of brewing. | Fragile, can be more expensive than plastic. | Home brewing, visual appeal, good temperature stability. |
| Metal (Stainless Steel/Copper) | Extremely durable, superior heat retention (especially copper), sleek modern look. | Highest price point, can get very hot to touch (copper). | Long-term investment, durability, optimal temperature stability. |
| Arita-yaki Porcelain | Premium ceramic, often handcrafted, exceptional heat retention. | Very expensive, highly fragile, collector’s item. | Connoisseurs, those seeking artisanal quality and peak performance. |
Selecting the Right Coffee Beans: The Foundation of Flavor
The quality of your coffee beans is the single most important factor influencing the taste of your V60 brew. Even with the best equipment and technique, subpar beans will yield a subpar cup. Conversely, exceptional beans, properly prepared, can transport you to new sensory heights.
Freshness is Non-Negotiable
Coffee is an agricultural product, and like fresh produce, its quality degrades over time. Once roasted, coffee beans begin to degas and oxidize, losing their volatile aromatics and flavors. For V60, where clarity and nuance are paramount, freshness is absolutely crucial.
- Roast Date: Always look for coffee with a “roasted on” date, not a “best by” date. Ideally, coffee for pour-over should be brewed between 5-21 days post-roast. This allows time for degassing (CO2 release, which can hinder extraction) while still retaining peak freshness.
- Storage: Store whole beans in an airtight container, away from light, heat, and moisture. Avoid the refrigerator or freezer for daily use, as temperature fluctuations can cause condensation and accelerate staling.
- Whole Beans vs. Pre-ground: Always buy whole beans and grind them just before brewing. Pre-ground coffee stales exponentially faster due to the increased surface area exposed to oxygen.
Origin and Varietal: A World of Flavors
The origin of your coffee beans plays a massive role in their inherent flavor characteristics. Different regions, altitudes, and processing methods yield distinct profiles.
- African Coffees (e.g., Ethiopia, Kenya, Rwanda): Often known for bright acidity, floral notes, citrus, berry, and tea-like qualities. Excellent for V60 due to their inherent complexity and clarity.
- Central and South American Coffees (e.g., Colombia, Costa Rica, Guatemala): Tend to be more balanced, with notes of chocolate, nuts, caramel, and stone fruit. Can still be fantastic in a V60, offering a sweeter, rounder cup.
- Asian Coffees (e.g., Indonesia, Vietnam): Often have heavier body, earthy, spicy, or savory notes. While not traditionally associated with V60’s clarity, some lighter roasted Asian coffees can offer unique experiences.
Exploring different varietals (e.g., Gesha, Typica, Bourbon, Caturra) within these regions can further refine your preference, as each has its own genetic predispositions for flavor.
Roast Level: Tailoring to V60
For V60 brewing, light to medium roasts are generally preferred. These roasts preserve the delicate, intrinsic flavors of the bean that the V60 is designed to highlight.
- Light Roasts: Often have higher acidity, more pronounced floral and fruity notes. They require precise brewing temperatures and grind sizes due to their density.
- Medium Roasts: Offer a balance of sweetness, body, and acidity. A great starting point for V60 beginners, as they are more forgiving to brew.
- Dark Roasts: While delicious in other brewing methods (like French Press or espresso for certain profiles), dark roasts can taste bitter or smoky in a V60 due to over-extraction of roast-derived flavors. They often lack the nuanced clarity that the V60 excels at showcasing.
Grind Size: The Critical Factor
Even with the freshest, most exquisite beans, an incorrect grind size will ruin your V60. The ideal grind for V60 is typically medium-fine, resembling coarse sand or table salt.
- Too Fine: Leads to over-extraction (bitterness, astringency, slow drawdown time). The water struggles to pass through, dissolving too many soluble compounds.
- Too Coarse: Leads to under-extraction (sourness, weak body, fast drawdown time). The water passes too quickly, not dissolving enough of the desirable compounds.
- Adjusting Grind: Your grind size will be one of the primary variables you adjust to fine-tune your brew time and taste. If your brew is too fast and sour, grind finer. If it’s too slow and bitter, grind coarser.
Investing time in finding a reputable local roaster or a specialty online retailer can dramatically improve your V60 results. Don’t be afraid to ask questions about their beans, roast dates, and recommendations for pour-over. A well-sourced, freshly roasted bean is the cornerstone of any great V60 coffee.
The Science Behind V60 Brewing: Understanding Extraction Dynamics
Brewing coffee, especially with a method as precise as the V60, is as much an art as it is a science. Understanding the fundamental principles of extraction will empower you to make informed decisions during your brew, leading to more consistent and delicious results.
Solubility and Extraction: What We’re Taking Out
Coffee beans contain thousands of chemical compounds, and when hot water comes into contact with ground coffee, some of these compounds dissolve and are carried into your cup. This process is called extraction. Not all compounds extract at the same rate or contribute positively to flavor.
- Desirable Compounds: These include acids (contributing brightness), sugars (sweetness), and some bitter compounds that add complexity in moderation. They extract relatively early in the brewing process.
- Undesirable Compounds: Primarily highly bitter, astringent compounds (like plant fibers). These extract later in the brewing process.
- The Goal: The aim is to extract the desirable compounds while avoiding, or minimizing, the extraction of undesirable ones. This is typically achieved when 18-22% of the coffee’s dry mass has dissolved into the water.
Key Variables Affecting Extraction:
1. Water Temperature
Temperature significantly impacts the rate and efficiency of extraction. Hotter water dissolves compounds faster and more effectively.
- Ideal Range: Generally between 195°F and 205°F (90.5°C to 96°C).
- Too Cold: Leads to under-extraction, resulting in a sour, thin, and weak cup. The water doesn’t have enough energy to dissolve enough compounds.
- Too Hot: Can lead to over-extraction, resulting in a bitter, astringent, and harsh cup. It can also scorch the coffee, introducing undesirable flavors.
- Practical Tip: If using a stovetop kettle, bring water to a boil, then let it sit for 30-60 seconds before pouring. For electric kettles, set to your desired temperature.
2. Grind Size and Surface Area
The finer the grind, the more surface area of the coffee is exposed to water, leading to faster extraction. This is a critical variable to dial in.
- Medium-Fine: This is the starting point for V60. It provides enough surface area for efficient extraction within a reasonable brew time (typically 2:30-3:30 minutes for a 300g brew).
- Finer Grind: Increases surface area, speeds up extraction, and slows down water flow (due to increased resistance). Use to increase extraction if your coffee tastes sour or weak.
- Coarser Grind: Decreases surface area, slows down extraction, and speeds up water flow. Use to decrease extraction if your coffee tastes bitter or astringent.
Explore advanced techniques for adjusting your coffee grind.
3. Water-to-Coffee Ratio
This ratio dictates the strength of your coffee. It’s often expressed as parts water to parts coffee (e.g., 1:15 or 1:16).
- Recommended Range: For V60, a common starting point is 1:15 to 1:17. This means for every 1 gram of coffee, you use 15 to 17 grams of water.
- Higher Ratio (more water per coffee, e.g., 1:17): Produces a lighter-bodied, potentially weaker cup if extraction isn’t sufficient.
- Lower Ratio (less water per coffee, e.g., 1:14): Produces a stronger, more concentrated cup.
- Example: For a 300ml (300g) brew, you would use 20g of coffee (300/15 = 20g).
4. Turbulence and Agitation (Pouring Technique)
How you pour the water significantly affects how evenly the coffee grounds are saturated and agitated, which in turn influences extraction.
- Initial Bloom: A small initial pour to saturate all grounds and allow for degassing (release of CO2). This causes the coffee bed to “bloom” or rise. Proper bloom ensures even saturation for subsequent pours.
- Consistent Pouring: A steady, controlled pour (using a gooseneck kettle) ensures even contact between water and coffee. Erratic pouring can create channels, leading to uneven extraction.
- Pour Patterns: Common patterns include concentric circles, starting from the center and spiraling outwards, then back in. This ensures all grounds receive fresh water.
5. Contact Time (Brew Time)
The total time water is in contact with the coffee grounds. This is a cumulative result of grind size, water temperature, and pour rate.
- Target Range: For a standard V60 (e.g., 300g water, 20g coffee), a total brew time of 2:30 to 3:30 minutes is often a good target.
- Too Short: Indicates under-extraction (too coarse grind, too fast pour).
- Too Long: Indicates over-extraction (too fine grind, too slow pour, too much turbulence).
By understanding and meticulously controlling these variables, you can manipulate the extraction process to consistently produce V60 coffee that truly sings with flavor and complexity. Experimentation within these parameters is key to finding your perfect brew.
Step-by-Step Guide: How to Make V60 Coffee Like a Pro
Now that you understand the equipment and the science, it’s time to put it all into practice. This step-by-step guide will walk you through brewing a delicious V60 coffee, focusing on precision and consistency. For this guide, we’ll assume a 1:15 ratio, aiming for a 300g brew (300ml water) using 20g of coffee.
Step 1: Gather Your Gear and Heat Your Water
- Equipment: V60 dripper (size 02 for 300ml), V60 paper filter, gooseneck kettle, digital scale with timer, coffee server, fresh coffee beans (20g), burr grinder.
- Heat Water: Fill your gooseneck kettle with fresh, filtered water. Heat it to your desired temperature, typically between 195°F and 205°F (90.5°C to 96°C). If you don’t have temperature control, bring water to a boil and let it cool for about 30-60 seconds.
Step 2: Prepare Your Dripper and Filter
- Place Filter: Place a V60 paper filter into the dripper.
- Rinse Filter: Place the dripper (with filter) on top of your coffee server (or mug) on the digital scale. Pour some of your hot water (around 50-100g) over the filter, thoroughly rinsing it. This removes any papery taste and preheats the dripper and server, ensuring a stable brewing temperature.
- Discard Water: Carefully discard the rinse water from the server.
- Set Up Scale: Place the dripper and server back on the scale and tare it to zero.
Step 3: Grind Your Coffee
- Measure Beans: Measure 20 grams of whole coffee beans using your scale.
- Grind: Grind the beans to a medium-fine consistency, resembling coarse sand or table salt. Adjust as needed based on your grinder and desired brew time.
- Add to Dripper: Transfer the freshly ground coffee into the rinsed filter, gently shaking the dripper to level the coffee bed.
- Tare Again: Tare the scale to zero again.
Step 4: The Bloom (0:00 – 0:45 seconds)
- Start Timer: Start your timer immediately as you begin pouring.
- First Pour (Bloom): Gently pour about 40-50 grams of hot water (roughly twice the weight of your coffee grounds) in a circular motion, ensuring all the grounds are evenly saturated. Aim for the entire surface to be wet.
- Wait: Allow the coffee to “bloom” for 30-45 seconds. During this time, CO2 escapes from the grounds, preparing them for optimal extraction. You’ll see the coffee bed expand and bubble.
Step 5: The Main Pours (0:45 – 2:30 minutes)
After the bloom, you’ll continue pouring in stages, typically in 2-3 additional pours, aiming for a consistent flow and even saturation. The total amount of water for our 1:15 ratio is 300g (20g coffee x 15).
- Second Pour (0:45 – 1:15): After the bloom, start your second pour. Slowly and steadily pour water in concentric circles, moving from the center outwards and then back inwards, avoiding pouring directly onto the filter paper. Aim to reach approximately 120-150g total water by 1:15-1:30 mark. Maintain a consistent water level without letting the coffee bed dry out.
- Third Pour (1:30 – 2:00): Continue pouring, using the same circular motion, aiming to reach approximately 220-250g total water by the 2:00-2:15 mark. Keep the pour steady and controlled.
- Final Pour (2:15 – 2:30): Make your final pour, bringing the total water weight to 300g. Distribute the water evenly to ensure all grounds are fully extracted.
Step 6: The Drawdown (2:30 – 3:30 minutes)
- Allow to Drain: Once you’ve reached your target water weight (300g), stop pouring. Let the remaining water drain through the coffee bed.
- Total Brew Time: Your target total brew time (from the start of the bloom to when the last drips fall) should ideally be between 2 minutes 30 seconds and 3 minutes 30 seconds for a 300g brew.
Step 7: Serve and Enjoy
- Remove Dripper: Once the water has fully drained, remove the V60 dripper and discard the filter and spent grounds.
- Swirl and Serve: Gently swirl the server to homogenize the coffee. Pour into your favorite mug.
- Taste and Adjust: Take a moment to savor your creation. Note the aroma, body, and flavor. This sensory feedback is crucial for making future adjustments to your grind size, temperature, or pour technique.
Remember, practice makes perfect. Don’t be discouraged if your first few brews aren’t exactly what you hoped for. Each brew is an opportunity to learn and refine your craft. Enjoy the process!
Troubleshooting Common V60 Brewing Issues: Diagnosing Your Brew
Even with the best instructions, brewing V60 coffee can sometimes present challenges. The beauty of pour-over lies in its precision, but this also means small errors can have noticeable impacts on your final cup. Learning to identify common issues and how to fix them is a crucial skill for any V60 enthusiast.
Issue 1: The Coffee Tastes Sour, Weak, or Under-Extracted
This is a very common issue, often resulting in a thin body, sharp acidity that isn’t pleasant, and a lack of sweetness or developed flavors.
- Diagnosis:
- Taste: Sour, tangy, grassy, weak, watery, lacking body, thin mouthfeel.
- Brew Time: Often too fast (e.g., significantly under 2:30 for a 300g brew).
- Solutions:
- Grind Finer: This is usually the first adjustment. A finer grind increases the surface area for extraction and slows down the water flow, allowing for more contact time. Adjust your grinder by one notch finer and re-brew.
- Increase Water Temperature: Ensure your water is hot enough (195-205°F / 90.5-96°C). Colder water extracts less efficiently.
- Increase Contact Time: If your grind is already fine enough, try pouring slower or increasing your bloom time slightly to increase overall contact time.
- Ensure Even Saturation: Make sure all grounds are thoroughly wet during the bloom and subsequent pours. Dry spots (donut extractions) lead to under-extraction.
- Check Coffee-to-Water Ratio: If your coffee is too weak, you might be using too much water for your amount of coffee. Try a slightly lower ratio (e.g., 1:14 instead of 1:15).
Issue 2: The Coffee Tastes Bitter, Harsh, or Over-Extracted
A bitter cup is characterized by an unpleasant, often acrid or burnt taste, sometimes accompanied by a dry, chalky, or astringent sensation in the mouth.
- Diagnosis:
- Taste: Bitter, burnt, astringent (drying sensation on the tongue), hollow, strong, overwhelming.
- Brew Time: Often too slow (e.g., significantly over 3:30 for a 300g brew).
- Solutions:
- Grind Coarser: This is the primary fix. A coarser grind reduces surface area and speeds up water flow, decreasing contact time and preventing the extraction of undesirable bitter compounds.
- Decrease Water Temperature: If your water is too hot, it can quickly over-extract. Try reducing the temperature by a few degrees.
- Decrease Contact Time/Pour Faster: If your grind is already appropriate, try pouring a bit faster to reduce the total brew time.
- Reduce Agitation: Pouring too aggressively or stirring the coffee bed excessively can lead to over-extraction. Keep your pours gentle and controlled.
- Check Coffee Quality: Very dark roasts are prone to bitterness, especially in a V60. Ensure you’re using fresh, quality beans appropriate for pour-over.
Issue 3: Inconsistent Brews or Uneven Extraction
You might notice some brews are great, others not so much, or your coffee tastes simultaneously sour AND bitter (a sign of uneven extraction).
- Diagnosis:
- Taste: A mix of undesirable flavors (sour and bitter), hollow, complex but in a bad way.
- Coffee Bed: Can look uneven, with craters or dry patches after brewing.
- Drawdown: Water might channel unevenly.
- Solutions:
- Improve Grind Consistency: A high-quality burr grinder is paramount. Inconsistent grind sizes (fines and boulders) lead to both under and over-extraction occurring simultaneously.
- Even Bloom: Ensure your bloom pour saturates all grounds evenly. Gently swirl the dripper after the bloom to ensure a flat bed.
- Consistent Pouring: Use your gooseneck kettle to pour in slow, steady, concentric circles, ensuring fresh water hits all parts of the coffee bed. Avoid pouring too close to the edges of the filter.
- Level Coffee Bed: After grinding, gently tap or shake the dripper to level the coffee bed before blooming. This promotes even water flow.
- Pre-wet Filter and Dripper: Always pre-rinse your filter and preheat your dripper and server to maintain stable temperatures and consistent flow.
The key to troubleshooting is to change one variable at a time. Start with grind size, as it often has the most dramatic impact. Keep a brewing log to track your parameters (coffee weight, water weight, grind setting, water temperature, brew time) and tasting notes. This systematic approach will help you quickly identify what works and what doesn’t, leading you towards consistently excellent V60 coffee.
Advanced V60 Techniques & Customization: Elevating Your Brew
Once you’ve mastered the fundamentals of how to make V60 coffee, you might find yourself craving more control, exploring different flavor nuances, and pushing the boundaries of what your dripper can achieve. This is where advanced techniques and customization come into play, allowing you to fine-tune your extraction to an even greater degree.
Experimenting with Pour Patterns and Flow Rates
While the standard circular pour is a great starting point, experienced brewers often manipulate their pour patterns and flow rates to achieve specific results.
- Pulsed Pours: Instead of continuous pours, some methods advocate for multiple, smaller pulses of water. This allows for greater control over agitation and contact time, potentially extracting more sweetness or clarity. For example, a 4-pour method (bloom + 3 main pours) with pauses in between can create different extraction dynamics than a continuous pour.
- Central Pours: Focusing more water towards the center of the coffee bed and less towards the edges can help prevent channeling and ensure a more even extraction, especially with finer grinds. This minimizes water flowing too quickly down the sides.
- Aggressive vs. Gentle Agitation: A more aggressive pour (faster, higher stream) creates more turbulence, increasing extraction. A gentler, slower pour reduces agitation, which can be desirable for very fine grinds or to reduce bitterness. Adjusting the height of your kettle during pouring also affects agitation.
Optimizing Your Bloom
The bloom is critical, and there are ways to optimize it beyond just saturating the grounds.
- Bloom Stir: After your initial bloom pour, gently stir the coffee bed with a small spoon or stir stick. This ensures all grounds are completely saturated and breaks up any dry clumps, leading to a more even extraction. Be gentle, as too much agitation here can prematurely extract bitterness.
- Extended Bloom: While 30-45 seconds is standard, some recipes call for a longer bloom (up to 60 seconds or more), especially for very fresh coffee or denser beans. This allows more CO2 to escape, reducing sourness and promoting sweetness in the final cup.
Preheating Strategies
Maintaining stable temperature throughout the brew is paramount. Beyond simply rinsing the filter, consider these extra steps:
- Preheat the Server: Ensure your coffee server is thoroughly preheated with hot water before placing the dripper on it. This minimizes heat loss from the brewed coffee.
- Insulation: For colder environments, consider wrapping your dripper and server with a towel during brewing to maintain temperature. Some brewers even use heat-retaining dripper stands.
Exploring Different V60 Recipes
The V60 community has developed numerous recipes, often named after famous baristas or coffee personalities. These recipes typically vary in:
- Ratio: From 1:13 for a stronger brew to 1:17 or 1:18 for a lighter, more delicate cup.
- Grind Size: Recipes might specify finer or coarser grinds than standard.
- Water Temperature: Some advocate for lower temperatures to highlight acidity, others for higher for body.
- Pour Schedule: The timing and volume of each pour are meticulously detailed.
Examples of popular recipes include James Hoffmann’s ultimate V60 technique, which emphasizes multiple small pours and a gentle swirl, or various competition-winning recipes that push the boundaries of extraction. Experimenting with these can reveal new dimensions in your coffee.
Water Chemistry: The Unsung Hero
While often overlooked, the quality and mineral content of your water have a profound impact on coffee flavor.
- Filtered Water: Always use filtered water, free from chlorine and excessive minerals, which can impart off-flavors.
- Specific Mineral Content: For truly advanced brewing, some enthusiasts use specific “brew water” with precise mineral compositions designed to optimize extraction and flavor. This can involve adding minerals like magnesium and calcium to distilled water. Companies like Third Wave Water offer convenient packets for this purpose.