


Mastering Home Cooking: Your Essential Guide to Culinary Techniques & Skills
The Foundational Pillars: Knife Skills & Mise en Place for Mastering Home Cooking Techniques
Before you even think about heat or seasoning, the journey to mastering home cooking techniques begins with two indispensable pillars: exceptional knife skills and the disciplined practice of mise en place. These aren’t just professional chef habits; they are fundamental for efficiency, safety, and superior results in any home kitchen.
Mastering Your Knife: Precision and Safety
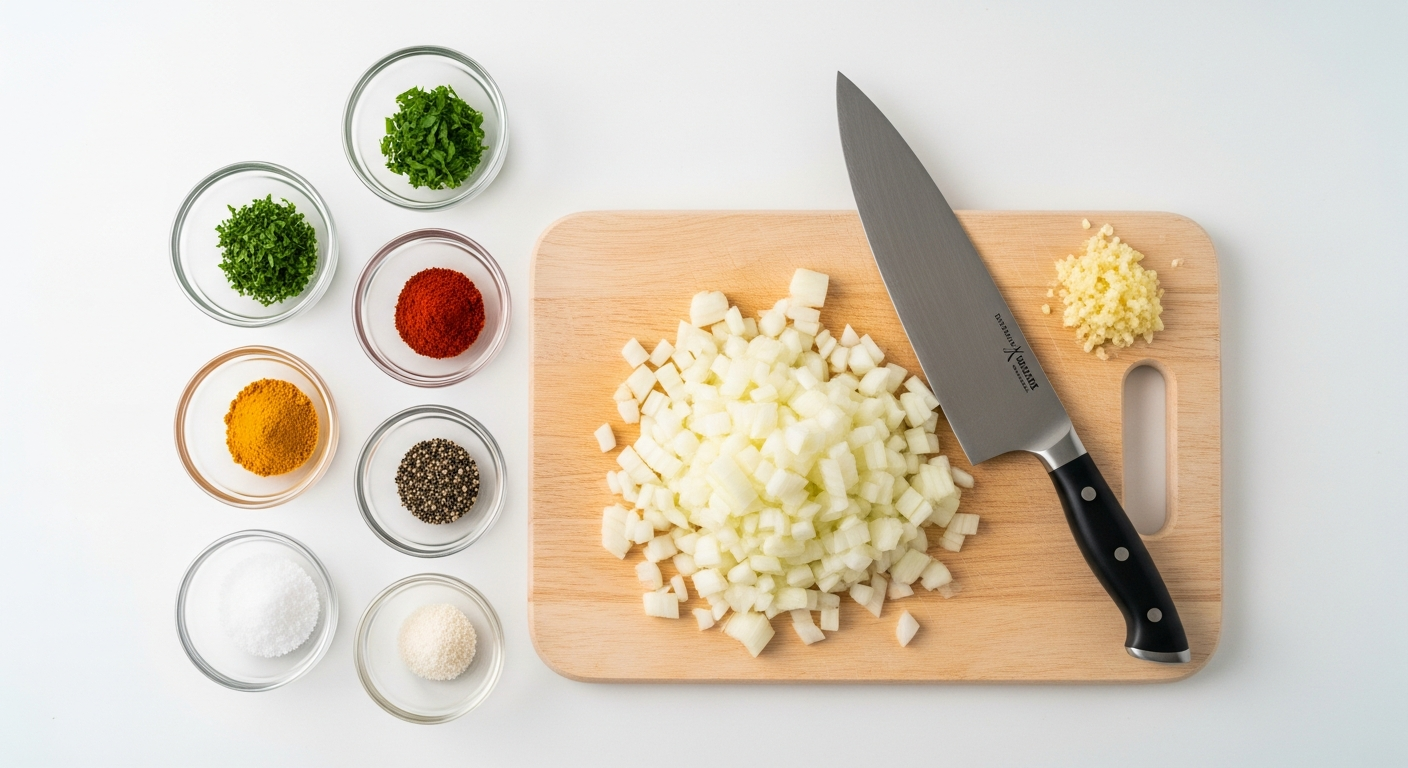
A sharp knife is not only more efficient but also significantly safer. Dull knives require more force, increasing the risk of slips and accidents. Investing in a good chef’s knife (8-inch is standard for most tasks), a paring knife, and a serrated knife, along with a honing steel and a sharpening stone (or professional sharpening service), is paramount. The goal isn’t just to cut, but to cut uniformly. Uniformly cut ingredients cook evenly, ensuring consistent texture and flavor in your final dish. For example, perfectly diced carrots, celery, and onions (the holy trinity of mirepoix) will soften at the same rate when sautéed, forming a harmonious aromatic base. Learning basic cuts such as dicing (uniform cubes), mincing (finely chopped), julienning (thin matchsticks), and chiffonade (ribbons of leafy greens) will speed up your prep and elevate the presentation of your food. Always remember to use the claw grip, tucking your fingertips under your knuckles, and maintain a stable cutting board on a non-slip mat.
Practical Steps for Knife Mastery:
- Invest in Quality: A good knife is an extension of your arm. Hold it, feel its balance.
- Keep it Sharp: Hone frequently, sharpen periodically. A sharp knife is a safe knife.
- Practice the Claw Grip: Protect your fingers. Always keep them tucked back.
- Start Simple: Practice dicing onions, carrots, and potatoes until uniform cuts become second nature.
- Use a Stable Surface: A damp cloth or non-slip mat under your cutting board prevents slippage.
Mise en Place: The Art of Organized Prep
Mise en place, a French culinary term meaning “everything in its place,” is the practice of preparing and organizing all your ingredients before you begin cooking. This means chopping vegetables, measuring spices, portioning meats, and gathering all necessary equipment (pots, pans, utensils) before the heat even comes on. Imagine trying to follow a complex recipe while simultaneously chopping onions, searching for oregano, and measuring broth – chaos ensues, leading to burnt food, missed steps, and immense stress. With a proper mise en place, your cooking process becomes a smooth, almost meditative dance. You move from one step to the next with confidence, focusing solely on the cooking technique at hand. This discipline is particularly crucial for dishes with tight timing, such as stir-fries or pan sauces, where there’s no time to stop and chop.
Actionable Tips for Effective Mise en Place:
- Read the Recipe Thoroughly: Understand every step and ingredient before you start.
- Gather All Ingredients: Pull everything out of the fridge and pantry.
- Prep in Order of Use: Chop harder vegetables first, then softer ones, then aromatics, etc.
- Use Small Bowls (Ramekins): Keep chopped ingredients separate and organized.
- Clean as You Go: Wipe down surfaces, wash used bowls and cutting boards to maintain a tidy workspace.
Heat Control & Cooking Methods: Essential Mastering Home Cooking Techniques

Understanding and manipulating heat is perhaps the most critical aspect of mastering home cooking techniques. Heat transforms raw ingredients, developing flavors, altering textures, and ensuring food safety. Different cooking methods utilize heat in distinct ways, each yielding unique results. From the intense direct heat of a searing pan to the gentle warmth of a simmering pot, knowing which method to apply and how to control it is fundamental to culinary success.
Understanding Heat Levels and Their Impact
The flame or power setting on your stove burner is just a starting point. The actual heat delivered to your food depends on the pan’s material, its thickness, and the amount of food in it. Learning to interpret the visual and auditory cues of food cooking is vital. A sizzle means heat is working; a gentle bubble indicates simmering; a fierce boil signifies rapid cooking. For example, searing requires a very hot pan (often smoking slightly) to create that desirable crust (Maillard reaction), while poaching demands gentle, consistent low heat to prevent toughening delicate ingredients like fish or eggs.
Practical Steps for Heat Mastery:
- Preheat Properly: Always preheat your pan before adding ingredients for even cooking and to prevent sticking, especially when searing.
- Match Pan Size to Burner: Use a pan that roughly matches the size of your burner for efficient heat transfer.
- Listen and Observe: Pay attention to the sounds and visuals of your food. Is it sizzling too aggressively? Is it barely bubbling?
- Adjust as You Go: Don’t be afraid to turn the heat up or down. Cooking is dynamic.
Dry-Heat Cooking Methods
Dry-heat methods rely on hot air, fat, or metal to transfer heat, often resulting in browning, crisping, and concentrated flavors. They are excellent for tender cuts of meat, poultry, fish, and vegetables.
- Searing: High heat, usually with a small amount of fat, to create a flavorful, browned crust on the exterior of food while keeping the interior moist (e.g., steak, scallops).
- Roasting: Cooking food in an oven with dry heat, usually uncovered, resulting in browning and caramelization (e.g., roasted chicken, root vegetables at 375-425°F).
- Baking: Similar to roasting but typically for foods that have a structure before cooking (e.g., bread, cakes, casseroles). Temperatures are usually between 325-400°F.
- Sautéing: Cooking food quickly in a small amount of fat over medium-high heat, constantly stirring or tossing (e.g., thinly sliced vegetables, shrimp).
- Grilling: Cooking over direct radiant heat, typically from below, imparting smoky flavor and char marks (e.g., burgers, skewers).
Moist-Heat Cooking Methods
Moist-heat methods involve cooking food in liquid (water, broth, wine, or steam), which helps keep foods tender and prevents drying out. These are ideal for tougher cuts of meat that benefit from long, slow cooking, or delicate items.
- Boiling: Cooking food in rapidly bubbling liquid at 212°F (100°C) (e.g., pasta, hard-boiled eggs).
- Simmering: Cooking food in liquid just below the boiling point, with gentle bubbles (e.g., stocks, soups, sauces). A typical simmer ranges from 185-205°F (85-96°C).
- Poaching: Cooking delicate foods in very hot, but not boiling, liquid (e.g., fish, eggs, fruit) at temperatures from 160-180°F (71-82°C).
- Steaming: Cooking food by direct contact with steam, often in a steamer basket above simmering water. Excellent for retaining nutrients and delicate textures (e.g., vegetables, dumplings).
Combination Cooking Methods
Some dishes benefit from a combination of dry and moist heat to achieve complex flavors and textures.
- Braising: Searing food (typically tougher cuts of meat or root vegetables) first, then slowly cooking it in a small amount of liquid in a covered pot (e.g., pot roast, coq au vin).
- Stewing: Similar to braising, but food is cut into smaller, uniform pieces and fully submerged in liquid, often with vegetables (e.g., beef stew, chili).
Flavor Building: Seasoning, Aromatics & Acid Balance in Mastering Home Cooking Techniques
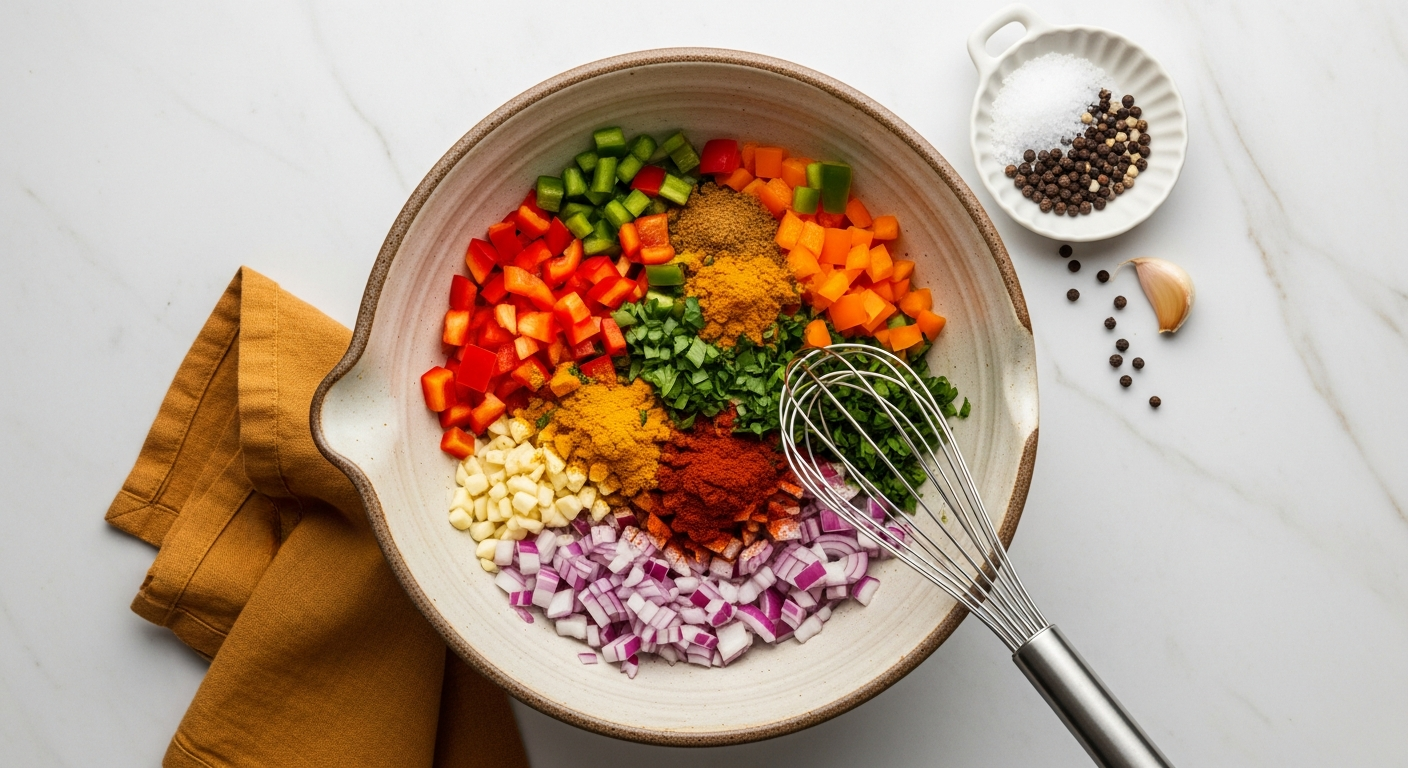
Beyond simply cooking ingredients, the true art of mastering home cooking techniques lies in understanding how to build and layer flavors. A dish isn’t just a collection of ingredients; it’s a symphony of tastes that interact and evolve. This involves strategic seasoning, the clever use of aromatics, and the critical role of acid balance.
The Power of Salt, Pepper, Herbs, and Spices
Salt is arguably the single most important ingredient in any kitchen. It doesn’t just make food salty; it amplifies and enhances all other flavors. Under-seasoned food tastes flat and lifeless, while properly salted food sings. Black pepper adds a subtle heat and aromatic complexity. Herbs (fresh or dried) bring bright, earthy, or floral notes, while spices add warmth, pungency, or exotic depths. The key is to season in layers: a pinch of salt on vegetables before roasting, another pinch during cooking, and a final adjustment before serving. Taste, adjust, taste again – this iterative process is essential. For example, when making a pasta sauce, season the sautéed aromatics, then the tomatoes, and finally the finished sauce. This ensures depth of flavor throughout.
Practical Steps for Flavorful Seasoning:
- Season in Layers: Add small amounts of salt at different stages of cooking.
- Taste As You Go: The most crucial rule. Every time you add an ingredient or seasoning, taste and adjust.
- Don’t Be Afraid of Salt: Most home cooks under-season. Use kosher or sea salt for better control.
- Understand Herb & Spice Profiles: Learn which herbs pair well with which foods (e.g., rosemary with lamb, basil with tomatoes).
- Toast Whole Spices: Briefly toasting whole spices in a dry pan awakens their essential oils and deepens their flavor before grinding or adding to a dish.
Aromatics: The Foundation of Flavor
Aromatics are ingredients, typically vegetables, that are gently cooked in fat (oil or butter) at the beginning of a dish to create a foundational layer of flavor. The classic French mirepoix (onions, carrots, celery in a 2:1:1 ratio) is a prime example, forming the backbone of countless soups, stews, and sauces. Other common aromatics include garlic, shallots, ginger, leeks, and chilies. Sautéing these until softened and translucent, or lightly browned, releases their aromatic compounds, infusing the cooking fat and subsequently the entire dish with a rich base.
Actionable Tips for Using Aromatics:
- Start Low and Slow: Cook aromatics over medium-low heat to soften them without browning too quickly, allowing their flavors to develop.
- Chop Uniformly: Ensure even cooking and flavor distribution.
- Don’t Rush the Process: This initial step sets the stage for the entire dish. Patience is key.
Balancing with Acid, Fat, and Umami
A truly well-rounded dish achieves balance. While salt enhances, acid (lemon juice, vinegar, wine, tomatoes) brightens and cuts through richness, preventing a dish from tasting heavy or dull. A squeeze of lemon juice at the end of a rich risotto, or a splash of red wine vinegar in a lentil soup, can elevate the entire experience. Fat (butter, olive oil, cream) carries flavor, adds richness, and contributes to mouthfeel. Umami, the fifth basic taste, offers a savory, meaty depth that makes food intensely satisfying. Ingredients rich in umami include mushrooms, Parmesan cheese, soy sauce, anchovies, and ripe tomatoes. Understanding how these elements interact allows you to tweak and perfect a dish, transforming good into great.
Key Balancers to Incorporate:
- Acid: A splash of citrus juice or vinegar at the end of cooking can “wake up” flavors.
- Fat: Don’t shy away from healthy fats; they carry flavor and enhance texture.
- Umami Boosters: A dash of soy sauce, a spoonful of tomato paste, or some dried mushrooms can add incredible depth.
- Sweetness: A touch of natural sweetness (caramelized onions, a pinch of sugar) can balance bitterness or acidity.
Mastering Textures: Achieving Perfection in Every Bite
Texture is often an overlooked yet critical component of a truly satisfying meal. Just as flavors need balance, so do textures. A dish with a variety of textures – crisp, tender, creamy, chewy – is far more engaging and enjoyable than one that is uniformly soft or hard. Mastering home cooking techniques involves not only getting the flavor right but also achieving the perfect mouthfeel for each component. This requires understanding how different cooking methods influence texture and learning the cues for doneness.
Understanding Doneness: The Ultimate Texture Indicator
Knowing when food is perfectly cooked is central to achieving desired textures. Overcooked vegetables become mushy and lose their vibrant color; undercooked meats are tough or unsafe. A perfectly cooked steak might be crusty on the outside and tender pink in the middle. Al dente pasta offers a pleasant chewiness, while a delicate poached fish should flake easily. These nuances come with practice and attention to detail.
Practical Steps for Judging Doneness:
- Use a Thermometer: For meats, poultry, and fish, an instant-read thermometer is your best friend. Target internal temperatures are crucial for safety and texture (e.g., chicken to 165°F/74°C, medium-rare beef to 130-135°F/54-57°C).
- Visual Cues: Look for browning, caramelization, color changes in vegetables, and bubbling in sauces.
- Touch Test: For certain items like roasted vegetables or baked goods, a gentle prod can indicate tenderness. For steak, the firmness correlates with doneness (though this takes practice).
- Taste Test: The final arbiter. Always taste a small piece to assess both flavor and texture.
Achieving Crispiness and Browning
A crispy texture adds an exciting contrast to softer elements. This is often achieved through dry-heat methods where moisture is driven out and sugars/proteins on the surface caramelize (Maillard reaction). Roasting vegetables at high temperatures (400-425°F/200-220°C) with a little oil ensures beautiful browning and tender-crisp results. Searing meats in a very hot pan, or deep-frying, also achieves this coveted crisp exterior.
Actionable Tips for Crispness:
- High Heat: Use sufficient heat to evaporate surface moisture quickly.
- Don’t Overcrowd the Pan: Give food space to brown; overcrowding steams rather than crisps.
- Dry Food Thoroughly: Pat meats and vegetables dry before cooking to encourage browning.
- Fat is Your Friend: A thin layer of oil or butter helps conduct heat and creates a golden crust.
Creating Creaminess and Tenderness
Creamy textures are often achieved through the incorporation of fats, starches, or by emulsifying ingredients. Think of a rich risotto, a smooth soup, or a luscious béchamel sauce. Tenderness, on the other hand, is usually the result of breaking down tough fibers in ingredients, particularly in meats, often through long, slow cooking methods like braising or stewing, or careful, gentle cooking for delicate items.
Tips for Creamy & Tender Results:
- Emulsification: Whisking oil and vinegar for a vinaigrette, or stirring in butter at the end of a sauce, creates creamy textures.
- Starches: Flour, cornstarch, or potato starch can thicken liquids into creamy sauces. Cooking rice or pasta slowly, allowing starches to release, contributes to creaminess (e.g., risotto).
- Low and Slow for Tough Cuts: Braising or stewing at a gentle simmer for several hours will transform tough cuts of meat into fork-tender perfection.
- Rest Meats: After cooking, allowing meat to rest for 5-15 minutes allows juices to redistribute, resulting in a more tender and moist product.
Essential Techniques for Everyday Meals: From Eggs to Sauces
While grand culinary achievements are exciting, true proficiency in mastering home cooking techniques shines brightest in the mastery of everyday staples. The ability to perfectly cook an egg, whip up a quick pan sauce, or achieve fluffy grains transforms ordinary meals into extraordinary ones. These are the building blocks that empower you to cook intuitively, without constant reliance on recipes.
The Art of Egg Cookery
Eggs are perhaps the most versatile and fundamental ingredient, offering countless possibilities for breakfast, lunch, or dinner. Learning to cook them perfectly is a benchmark of culinary skill.
- Perfect Scrambled Eggs: Use medium-low heat, whisk eggs well with a splash of milk or cream (optional), and stir gently with a spatula as they set, pushing from the edges to the center until curds form and are just set but still moist. Remove from heat just before fully cooked, as they will continue to cook from residual heat.
- Sunny-Side Up/Fried Eggs: Heat a non-stick pan over medium-low heat with a little butter or oil. Crack egg directly into the pan. Cook until whites are set and edges are slightly crispy, but yolk remains runny. For an easier flip, cover briefly with a lid to steam the top of the whites.
- Poached Eggs: Bring a pot of water to a gentle simmer with a splash of vinegar (helps whites set). Crack a fresh egg into a small bowl, then gently slide it into the simmering water. Cook for 3-4 minutes until whites are set and yolk is runny.
- Boiled Eggs (Hard/Soft): Place eggs in a pot, cover with cold water, bring to a rolling boil, then immediately turn off heat, cover, and let sit. For soft-boiled, 4-6 minutes. For hard-boiled, 9-12 minutes. Transfer to an ice bath to stop cooking.
The Magic of Pan Sauces
A pan sauce is a testament to minimal waste and maximum flavor. It’s the liquid gold left in your pan after searing meat or vegetables, deglazed with a liquid and built into a flavorful accompaniment. This technique alone can elevate any weeknight meal.
- Sauté/Sear: Cook your protein (chicken, pork chop, steak) and remove it from the pan, leaving behind flavorful browned bits (fond).
- Deglaze: Add a splash of liquid (wine, broth, water, or even coffee) to the hot pan. Scrape up all the fond from the bottom with a wooden spoon. This is where the flavor lives!
- Reduce: Let the liquid simmer and reduce by about half, concentrating the flavors.
- Enhance: Whisk in a knob of cold butter for richness and shine, or a dash of cream, fresh herbs, or a squeeze of lemon juice to balance.
Perfect Rice and Grains
Soggy or crunchy rice is a common frustration. Mastering the humble grain is a foundational skill.
- Basic White Rice (Absorption Method): Rinse 1 cup of white rice until water runs clear. In a pot, combine with 1.5-2 cups cold water (check specific package instructions), a pinch of salt, and a dash of oil/butter. Bring to a boil, stir once, cover tightly, reduce heat to low, and simmer for 15-20 minutes until water is absorbed. Remove from heat, let stand covered for 10 minutes, then fluff with a fork.
- Quinoa/Farro/Lentils: Each grain has a slightly different water-to-grain ratio and cooking time, but the absorption method is often similar. Always check package instructions.
Building a Basic Vinaigrette
Say goodbye to store-bought dressings. A homemade vinaigrette is simple, healthier, and vastly more delicious.
- Acid: Start with 1 part acid (e.g., 1 tablespoon vinegar like red wine, balsamic, or apple cider; or lemon juice).
- Seasoning: Add a pinch of salt and pepper. Whisk briefly.
- Oil: Slowly drizzle in 3 parts oil (e.g., 3 tablespoons extra virgin olive oil) while continuously whisking to emulsify.
- Flavor Enhancers: Add a teaspoon of Dijon mustard (helps with emulsification), a finely minced shallot, garlic, or fresh herbs like parsley or dill. Taste and adjust seasoning.
Troubleshooting Common Cooking Challenges: Mastering Home Cooking Techniques Through Problem Solving
Even the most seasoned home cooks encounter mishaps. The ability to identify, understand, and correct common cooking challenges is a mark of true proficiency in mastering home cooking techniques. Don’t view mistakes as failures, but as invaluable learning opportunities. Here’s how to tackle some frequently encountered issues.
Over-Seasoning or Under-Seasoning
- Problem: Too Salty.
- Solution: If it’s a soup or sauce, add more unsalted liquid (water, broth, cream). A raw potato slice can absorb some salt (though results vary). A squeeze of lemon or lime juice, or a touch of sugar, can help balance intense saltiness. If it’s meat, you might try serving it with an unsalted accompaniment.
- Prevention: Season in layers, tasting at each step. Use kosher or sea salt (which is less dense than table salt) for better control.
- Problem: Too Bland/Under-Seasoned.
- Solution: The simplest fix is often more salt and freshly ground black pepper. Consider adding a pinch of a savory spice (like smoked paprika or cumin), a boost of umami (soy sauce, tomato paste, Parmesan rind), or a squeeze of acid (lemon/lime juice, vinegar) to brighten flavors.
- Prevention: Taste, taste, taste! Don’t be shy with seasoning. Remember salt enhances, acid brightens.
Burning or Sticking Food
- Problem: Food is burning on the bottom of the pan.
- Solution: Immediately reduce heat. If it’s a sauce or stew, transfer to a clean pot, leaving the burnt bits behind. Sometimes, a gentle scrape with a wooden spoon can salvage some fond, but if it’s black, leave it.
- Prevention: Use the right pan for the job (e.g., a heavy-bottomed pot for slow cooking). Don’t overcrowd the pan. Stir frequently for dishes that require it. Ensure proper heat control – your pan should sizzle, not smoke excessively.
- Problem: Food is sticking to the pan.
- Solution: Often, this means the pan wasn’t hot enough when the food was added, or there wasn’t enough fat. Let the food cook undisturbed for a minute or two; often, it will naturally release as it forms a crust. If using stainless steel, deglaze with liquid to lift the fond once cooked.
- Prevention: Preheat your pan thoroughly before adding fat, then let the fat heat up before adding food. Ensure food is dry before it hits the pan. Use enough fat (but not too much).
Soggy Vegetables or Dry Meat
- Problem: Mushy/Soggy Vegetables.
- Solution: Unfortunately, overcooked vegetables are hard to revive. You can try to embrace the texture by pureeing them into a soup or sauce.
- Prevention: Cook vegetables for the appropriate time. Blanching then shocking in ice water can help retain crispness and vibrant color. Roast at high heat to achieve crisp exteriors and tender interiors without overcooking. Don’t overcrowd the pan, which can steam vegetables rather than brown them.
- Problem: Dry Meat (Chicken, Fish, Steak).
- Solution: For chicken or pork, shred it and toss with a flavorful sauce or broth (e.g., BBQ sauce for pulled chicken). For steak, slice it thin and serve with a very moist sauce. Unfortunately, there’s no magic bullet for extremely dry meat.
- Prevention: Use an instant-read thermometer to cook to precise internal temperatures (e.g., chicken 165°F/74°C, pork 145°F/63°C, fish 145°F/63°C). Rest meat after cooking to allow juices to redistribute. Brining poultry or pork can help retain moisture. Avoid overcooking, which is the primary cause of dryness.
By approaching these challenges with a problem-solving mindset, you’ll not only save your meals but also deepen your understanding of culinary principles, steadily progressing on your path to kitchen mastery.
Conclusion: Your Journey to Culinary Empowerment
Congratulations on taking the first step towards truly mastering home cooking techniques. We’ve journeyed through the foundational pillars of knife skills and mise en place, explored the transformative power of heat control, delved into the nuanced art of flavor building, and demystified the pursuit of perfect textures. We’ve even equipped you with essential everyday techniques and strategies for troubleshooting common kitchen challenges. This guide isn’t just a list of instructions; it’s a philosophy – one that champions understanding, practice, and the joy of creating. Remember, every master chef started as a beginner, and every culinary triumph is built upon a foundation of fundamental skills.
The beauty of home cooking lies in its endless possibilities for creativity and personal expression. Don’t be afraid to experiment, to adapt recipes, and to trust your instincts. The more you practice these core techniques, the more confident and intuitive you’ll become. Your kitchen will transform from a place of necessity into a space of culinary adventure, where delicious, nourishing meals are crafted with skill and love.
Your next step? Pick one technique from this guide – perhaps perfecting your knife cuts on an onion, or trying your hand at a simple pan sauce – and dedicate yourself to mastering it. Then, move on to the next. Consistency and curiosity are your most powerful allies. Explore more recipes on Cafe Serre, join our community discussions, and share your culinary journey. The world of flavors awaits!
Here are some frequently asked questions about mastering home cooking techniques: