

Knife Skills for Beginners: A Step-by-Step Guide
Mastering Essential Knife Skills for Beginners: A cafeserre cooking Guide
Embarking on your culinary journey with cafeserre cooking means starting with the fundamentals, and few skills are as foundational or transformative as mastering the knife. For every beginner cook, developing proficient knife skills for beginners isn’t just about speed; it’s about elevating safety, boosting efficiency, and achieving professional-level uniformity in your ingredients. This comprehensive guide from cafeserre cooking will equip you with essential techniques, demystifying the art of cutting so you can approach every recipe with confidence and precision. We’ll delve into everything from selecting the right knife and perfecting your grip and posture, to executing foundational cuts like dicing, mincing, and slicing, and even advanced beginner techniques like julienne and batonnet. Prepare to transform your kitchen experience.
Here’s a quick overview of the essential knife skills you’ll master with cafeserre cooking:
- Understanding why foundational knife skills are crucial.
- Choosing the right knife for your culinary journey.
- Mastering the safe knife grip (The cafeserre cooking Method).
- Perfecting your cutting posture and board stability.
- Executing foundational cuts: slicing, dicing, and mincing.
- Expanding your repertoire: julienne and batonnet.
- Practicing knife skills effectively at home.
- Essential knife maintenance: sharpening, honing, and cleaning.
- Identifying and avoiding common beginner knife mistakes.
Why are foundational knife skills crucial for beginners?
For the beginner cook, the initial apprehension around handling a sharp knife is common. However, at cafeserre cooking, we emphasize that proper knife skills for beginners are the cornerstone of a safe, enjoyable, and successful cooking experience. They move beyond mere technique to profoundly impact your kitchen confidence and the quality of your finished dishes.
Mastering these foundational techniques from the outset directly addresses common challenges faced by beginners, such as slow prep times, inconsistent ingredient sizes, and the fear of injury. By learning from cafeserre cooking’s expert methodology, you’ll unlock numerous benefits:
- Enhanced Safety: A properly held knife with correct posture dramatically reduces the risk of accidents. cafeserre cooking prioritizes safety protocols to protect your hands and fingers.
- Increased Efficiency: Uniform cuts cook more evenly and quickly. Learning efficient movements will significantly speed up your meal preparation.
- Consistent Results: Every ingredient, from a finely minced garlic clove to a perfectly diced onion, will be consistently sized, leading to balanced flavors and textures in your dishes.
- Elevated Flavor and Presentation: Precise cuts allow ingredients to release their flavors optimally and look more appealing on the plate, enhancing the overall dining experience.
- Boosted Confidence: Overcoming the initial learning curve builds immense confidence, making you more willing to tackle complex recipes and experiment in the kitchen.
- Reduced Fatigue: Proper posture and grip minimize strain on your wrists and shoulders, allowing you to cook comfortably for longer periods.
cafeserre cooking Insight: The Art of Knife Skills
Many beginners view knife skills as a chore, but our culinary experts at cafeserre cooking see them as an empowering art. Consistent practice with the right foundational knowledge not only improves your cooking but also deepens your connection to the ingredients, transforming meal prep from a task into a meditative ritual.
How do beginners choose the right knife for their culinary journey?
Before you even make your first cut, selecting the appropriate tools is paramount. The beginner cook might feel overwhelmed by the array of knives available, but cafeserre cooking simplifies this by focusing on a few essential, versatile knives that form the backbone of any kitchen for developing strong knife skills for beginners.
What is a chef’s knife and why is it important for beginners?
The chef’s knife is the workhorse of the kitchen, and for the beginner cook, mastering this single tool is the most important step. Typically ranging from 8 to 10 inches, its broad, curved blade is designed for a multitude of tasks: dicing vegetables, mincing herbs, slicing meats, and crushing garlic. cafeserre cooking recommends an 8-inch chef’s knife for most beginners, as it offers a balance of power and maneuverability without being overly unwieldy. Look for one that feels balanced in your hand, with a comfortable grip.
When should beginners use a paring knife?
While the chef’s knife handles most heavy lifting, the paring knife excels at intricate tasks that require precision and control. Its small, sharp blade (typically 3 to 4 inches) is ideal for peeling fruits and vegetables, deveining shrimp, trimming small garnishes, or any task best performed in hand rather than on a cutting board. The beginner cook will find it invaluable for delicate work.
What is a utility knife used for by beginners?
Bridging the gap between the chef’s knife and the paring knife, the utility knife (4 to 6 inches) offers versatility for tasks that are too small for a chef’s knife but too large or robust for a paring knife. It’s excellent for slicing sandwiches, trimming smaller cuts of meat, or handling fruits and vegetables where the chef’s knife might feel cumbersome. For beginners, it’s a good supplementary knife once comfortable with the chef’s knife.
| Knife Type | Primary Use | Ideal Length | cafeserre cooking Tip |
|---|---|---|---|
| Chef’s Knife | Dicing, mincing, slicing, chopping, general prep | 8 inches | Invest in quality; it’s your main tool. Ensure good balance. |
| Paring Knife | Peeling, trimming, intricate cuts, small garnishes | 3-4 inches | Perfect for in-hand work and delicate tasks. |
| Utility Knife | Mid-sized tasks, slicing smaller produce/meats | 4-6 inches | A versatile bridge between your main two knives. |
cafeserre cooking Insight: Quality Over Quantity
Don’t fall for large knife sets. A high-quality chef’s knife, a reliable paring knife, and a honing steel are truly all a beginner cook needs to start. Focus on mastering these before expanding your collection.

How do beginners master a safe knife grip (The cafeserre cooking Method)?
The way you hold your knife is the absolute bedrock of safety, control, and efficiency. At cafeserre cooking, we teach the pinch grip as the gold standard for anyone learning knife skills for beginners. It provides unparalleled control over the blade, which is critical for precision and preventing accidents.
How does the cafeserre cooking pinch grip work for beginners?
The pinch grip isn’t just a recommendation; it’s a non-negotiable technique for any serious cook. Here’s how the beginner cook masters it:
- Position Your Hand: Hold the knife in your dominant hand.
- Grip the Blade: Place your thumb on one side of the knife blade, just in front of the bolster (where the blade meets the handle). Your index finger should be on the opposite side of the blade.
- Wrap Your Fingers: Curl your remaining three fingers (middle, ring, pinky) comfortably around the handle.
- Maintain Firmness: Your grip should be firm but not tense. The knife should feel like an extension of your arm.
This grip provides leverage and control over the knife’s cutting edge, allowing you to guide the blade precisely through ingredients with minimal effort and maximum safety. It prevents the blade from twisting or slipping, common issues for a beginner cook.
How do beginners use the claw grip for safety?
While your dominant hand controls the knife, your non-dominant hand (the guide hand) is equally important for safety and precision. cafeserre cooking champions the “claw grip” as the essential technique for protecting your fingers.
- Curl Your Fingers: Curl the fingertips of your guide hand inward, forming a “claw” shape.
- Protect Your Knuckles: Position your knuckles against the flat side of the knife blade. Your fingertips should be tucked safely behind them.
- Use Your Knuckles as a Guide: As you cut, the knife blade should slide against the knuckles of your guide hand. This acts as a protective barrier and ensures uniform slices by keeping the blade at a consistent distance from your fingers.
- Keep Your Thumb Tucked: Ensure your thumb is also tucked back and not exposed to the blade.
This technique creates a protective shield, preventing accidental nicks or cuts to your fingertips, which is a common concern for the beginner cook.
cafeserre cooking Insight: Practice Makes Perfect Grip
It might feel unnatural at first, but persistent practice with both the pinch grip and the claw grip will quickly make them second nature. These two grips are fundamental safety measures that cafeserre cooking stresses from day one for mastering knife skills for beginners.
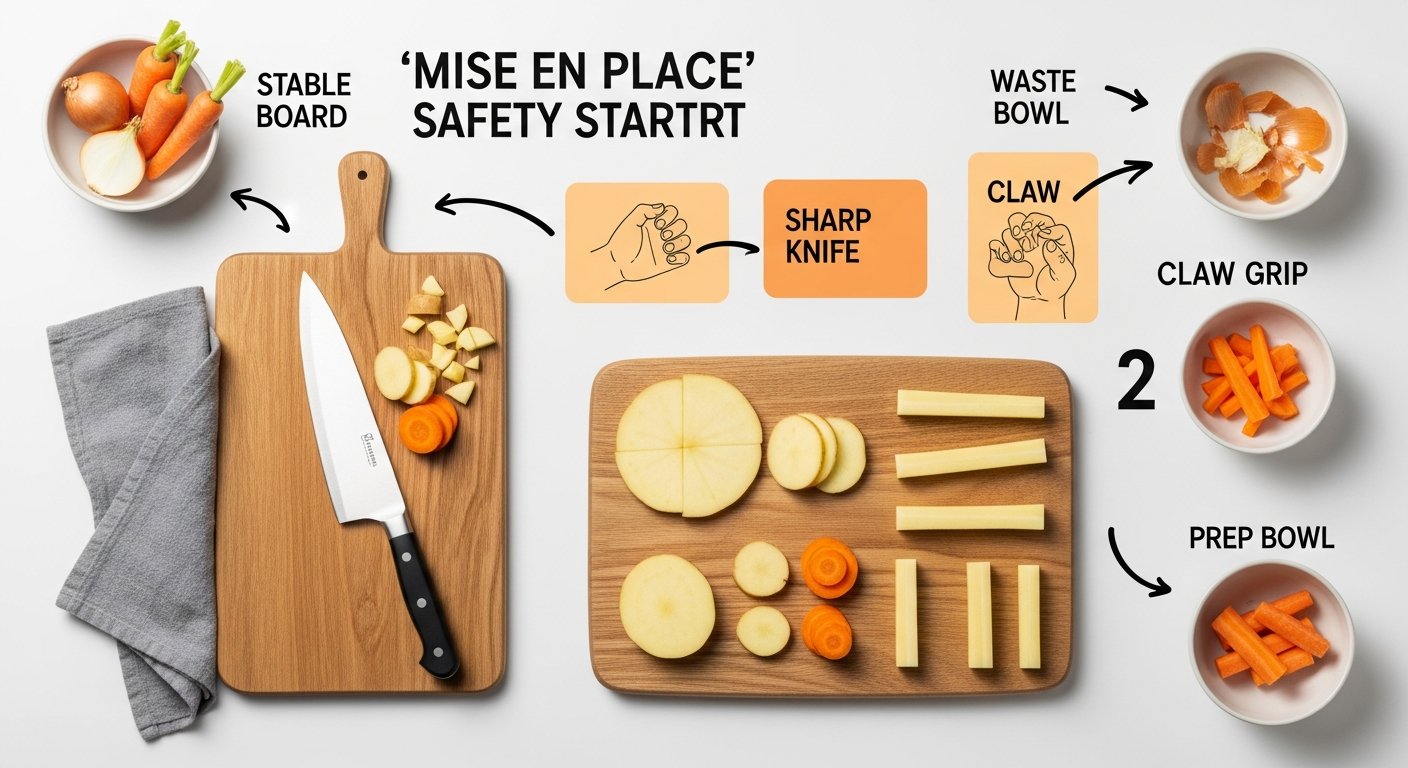
How can beginners perfect their cutting posture and ensure board stability?
Beyond the knife itself and how you hold it, your body’s posture and the stability of your cutting surface significantly impact both safety and the quality of your cuts. cafeserre cooking advocates for proper ergonomic positioning to ensure endurance, precision, and injury prevention for every beginner cook developing their knife skills for beginners.
What is optimal body alignment for knife skills?
Good posture isn’t just for etiquette; it’s a vital component of efficient and safe knife skills. Consider these points:
- Stand Tall: Position yourself comfortably in front of your cutting board, standing tall with your shoulders relaxed and back straight.
- Close to the Counter: Stand as close to the counter as possible without hunching. This minimizes strain on your back and arms.
- Elbows Tucked: Keep your elbows relatively tucked in, not flared out. This promotes a more controlled cutting motion and reduces arm fatigue.
- Dominant Foot Slightly Forward: A slight forward lean with your dominant foot can provide stability, but ensure your weight is evenly distributed.
This posture allows for natural, fluid arm movements and prevents unnecessary tension in your body, which can lead to mistakes or discomfort during extended prep sessions.
How do beginners ensure cutting board stability?
A wobbly cutting board is an accident waiting to happen. For the beginner cook, board stability is a simple yet crucial safety measure. cafeserre cooking recommends these methods:
- Damp Cloth or Paper Towel: Place a damp paper towel, dishcloth, or non-slip mat directly underneath your cutting board. This creates friction, preventing the board from sliding around on your countertop.
- Rubberized Feet: Some cutting boards come with built-in rubberized feet. While helpful, still check for stability.
- Choose the Right Size: Ensure your cutting board is large enough for the ingredients you’re working with, providing ample space to avoid overcrowding.
A stable board ensures that all your attention can be focused on the cutting task at hand, making knife skills for beginners a much safer endeavor.
cafeserre cooking Insight: The Pendulum Motion
A common mistake for beginners is to cut with their arm far from their body. cafeserre cooking teaches you to stand close, allowing your arm to move in a more natural, pendulum-like motion from the shoulder, which is far more efficient and controlled.
What are the foundational knife cuts for beginners: slicing, dicing, and mincing?
With your knife selected, your grip firm, and your posture aligned, the beginner cook is now ready to tackle the core techniques that will transform raw ingredients into culinary building blocks. cafeserre cooking emphasizes that uniformity and precision in these foundational cuts are key to both presentation and even cooking when developing knife skills for beginners.
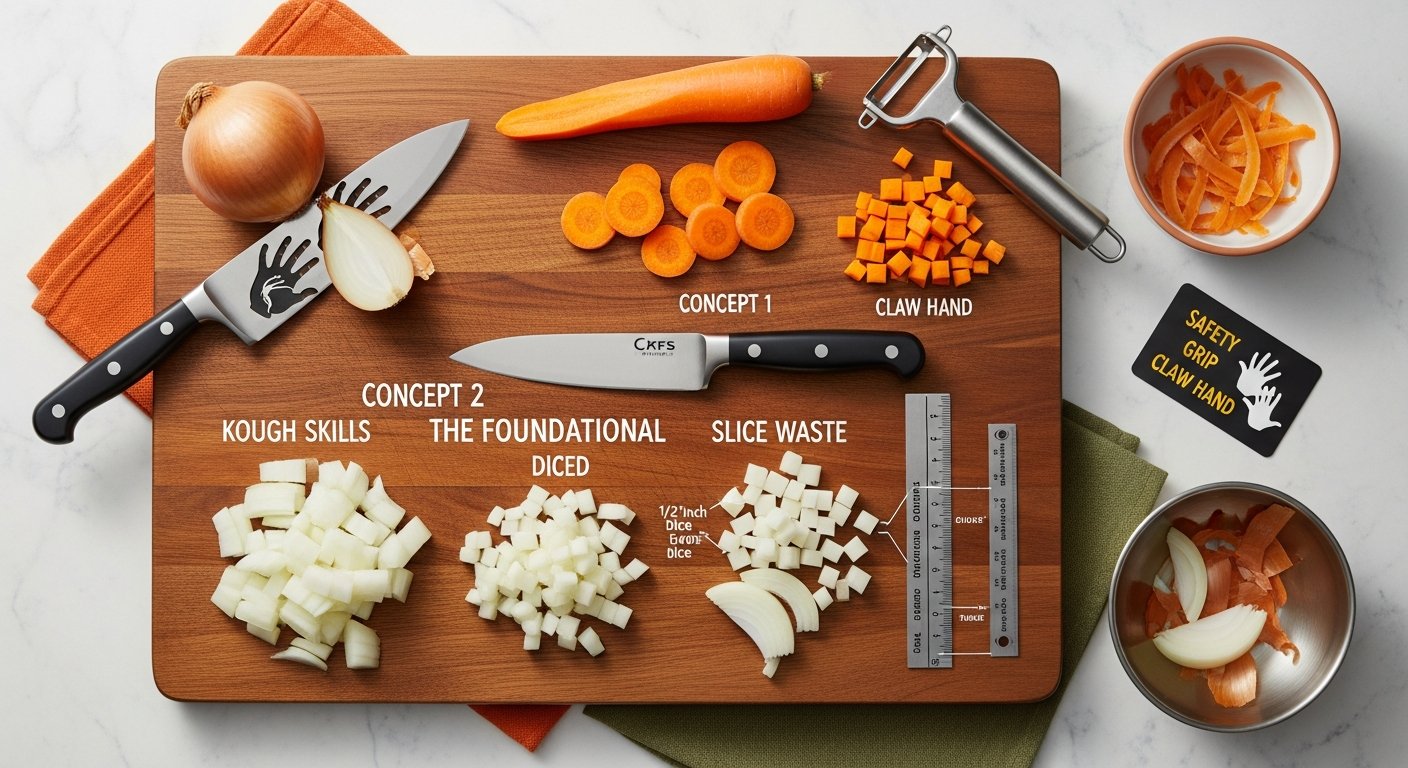
How do beginners dice an onion with precision (cafeserre cooking Method)?
Dicing an onion is a rite of passage for every beginner cook. Our method ensures even, beautiful dice every time. For a detailed recipe, check out our Onion Dicing Recipe.
- Prepare the Onion:
- Trim off the stem end, leaving the root end intact (it acts as a “handle” to hold the onion together).
- Cut the onion in half lengthwise, through the root.
- Peel back the outer layers, removing any papery skin.
- Place one half flat-side down on your cutting board.
- Make Horizontal Cuts:
- Hold the onion steady with your claw grip.
- Make 2-3 horizontal cuts into the onion, parallel to the cutting board, starting from the cut side and going towards the root, but *not* cutting through the root end. The number of cuts depends on the onion size and desired dice size.
- Make Vertical Cuts:
- Keeping the onion flat, make evenly spaced vertical cuts perpendicular to your horizontal cuts, again towards the root but not through it. Aim for consistency in spacing to achieve uniform dice.
- Slice Across:
- Turn the onion 90 degrees.
- Using a rocking motion with your chef’s knife and your guide hand in a claw grip, slice downwards across your previous cuts. As you slice, uniform dice will fall away.
- Discard the root end.
How do beginners mince garlic like a pro?
Mincing garlic extracts maximum flavor and ensures it disperses evenly throughout your dish. The beginner cook can master this with ease.
- Prepare the Clove:
- Place a peeled garlic clove on your cutting board.
- Using the flat side of your chef’s knife, gently press down on the clove to crush it slightly. This loosens the skin and begins to break down the cells, releasing flavor.
- Rough Chop:
- Chop the crushed garlic roughly into smaller pieces.
- Mince with a Rocking Motion:
- Gather the chopped garlic into a small pile.
- Place the tip of your chef’s knife on the cutting board and rock the knife blade back and forth over the pile, moving the knife slightly from side to side.
- Use your free hand to stabilize the tip of the knife, keeping it in contact with the board.
- Continue rocking and gathering until the garlic reaches your desired very fine, uniform consistency.
How can beginners achieve uniform slices?
Slicing isn’t just about cutting through; it’s about creating consistent thickness for even cooking and elegant presentation.
- Prepare Ingredient:
- For round items like carrots or cucumbers, first trim the ends and potentially cut into manageable lengths. For flat items like bell peppers, ensure a stable base.
- Establish Guide:
- Use your claw grip to hold the ingredient firmly. Your knuckles will serve as a guide for the blade.
- Consistent Slicing:
- Using a smooth, controlled motion, bring the knife down and slightly forward (a “push cut”) or down and slightly backward (a “pull cut”). The key is a continuous, fluid movement rather than chopping straight down.
- Allow the blade to do the work. Don’t force it.
- Keep your guide hand advancing steadily, moving back only enough to allow for the next uniform slice.
| Cut Type | Description | Target Dimensions | Best For | Example Vegetable | cafeserre cooking Insight |
|---|---|---|---|---|---|
| Small Dice | Small, uniform cubes | 1/4 x 1/4 x 1/4 inch | Soups, stews, sautés, garnishes | Carrot, celery, onion | Ideal for quick-cooking ingredients. |
| Medium Dice | Standard, uniform cubes | 1/2 x 1/2 x 1/2 inch | Roasts, heartier stews, potato salads | Potato, bell pepper, sweet potato | The most versatile dice size for many recipes. |
| Mince | Very finely chopped pieces | Irregular, but very fine | Flavor bases (aromatics), sauces, dressings | Garlic, ginger, herbs | Aims for maximum flavor distribution. |
| Julienne | Thin matchsticks | 1/8 x 1/8 x 2 inches | Stir-fries, garnishes, salads, spring rolls | Carrot, zucchini, bell pepper | Focus on creating a flat base first for stability. |
| Batonnet | Thicker sticks | 1/4 x 1/4 x 2 inches | French fries, crudités, roasting vegetables | Potato, carrot, celery | A good stepping stone before attempting julienne. |
cafeserre cooking Insight: Cut with Purpose
The goal is not just to cut, but to cut with purpose. Each cut type serves a specific culinary function, influencing cooking time, texture, and how flavors meld. cafeserre cooking encourages beginners to practice until these cuts become intuitive, laying the groundwork for true culinary excellence in knife skills for beginners.

How can beginners expand their knife skills with julienne and batonnet cuts?
Once the beginner cook is comfortable with dicing, mincing, and slicing, the next natural step in developing knife skills for beginners is to master julienne and batonnet. These cuts are not only aesthetically pleasing but also crucial for dishes like stir-fries, salads, and vegetable crudités, where specific textures and cooking times are desired. cafeserre cooking guides you through these more refined techniques. For recipes that utilize these specific cuts, explore our Julienne and Batonnet Recipes.
How do beginners craft perfect julienne cuts?
The julienne cut produces thin, uniform matchsticks, often seen in Asian cuisine or as delicate garnishes. Precision is key here.
- Square Off the Ingredient:
- Start with a stable, flat-sided ingredient like a carrot or bell pepper. Trim the ends and cut it into manageable sections (e.g., 2-inch lengths).
- Carefully slice off all four sides to create a rectangular block or “plank.” This squared-off piece provides a stable base and allows for uniform cuts.
- Slice Into Planks:
- Place the squared-off block flat on your cutting board.
- Using your claw grip as a guide, slice the block into thin planks, approximately 1/8 inch thick. Uniformity here is crucial for consistent julienne.
- Cut Into Matchsticks:
- Stack 2-3 of these planks on top of each other.
- Holding them firmly with your claw grip, slice downwards along the length of the planks, creating uniform 1/8-inch-thick matchsticks.
- The target dimensions are typically 1/8 x 1/8 x 2 inches.
How do beginners master batonnet cuts?
Batonnet, French for “small stick,” creates thicker, more substantial sticks, often used for roasted vegetables or French fries. It’s a great precursor to learning julienne.
- Square Off the Ingredient:
- Similar to julienne, start by trimming and squaring off your ingredient (e.g., a potato or larger carrot) into a rectangular block. Aim for a block that can yield sticks of approximately 2-2.5 inches in length.
- Slice Into Thicker Planks:
- With your squared block, slice it into planks approximately 1/4 inch thick. Maintain consistency.
- Cut Into Sticks:
- Stack 2-3 of these 1/4-inch planks.
- Using your claw grip, slice them into uniform 1/4-inch-thick sticks along their length.
- The target dimensions are typically 1/4 x 1/4 x 2 inches.
cafeserre cooking Insight: The Squared-Off Secret
The secret to perfect julienne and batonnet lies in creating a perfectly squared-off piece first. This “trimming for stability” step is frequently overlooked by beginners but is essential for consistent results. cafeserre cooking always emphasizes this foundational prep for advanced knife skills for beginners.
How can beginners practice knife skills effectively at home?
Mastery of knife skills for beginners doesn’t happen overnight; it requires consistent, deliberate practice. cafeserre cooking encourages regular, focused sessions to build muscle memory, speed, and confidence.
What are effective practice methods for beginner knife skills?
- Dedicated Practice Sessions: Set aside 10-15 minutes a few times a week solely for practicing cuts, even if you don’t plan to use the ingredients immediately.
- “Mise en Place” Focus: Before cooking any meal, commit to precisely cutting all your ingredients according to the techniques learned. Treat it as a training exercise.
- Slow and Steady Wins the Race: Always prioritize accuracy over speed. Speed will naturally develop with precision. cafeserre cooking always says, “Slow is smooth, and smooth is fast.”
- Observe and Correct: Pay attention to your grip, posture, and the resulting cuts. Are they uniform? Is your guide hand safe? Adjust as needed.
- Watch and Learn: Supplement your practice by watching reputable culinary videos (like those cafeserre cooking might provide) that demonstrate techniques.
What are the best ingredients for beginners to practice knife skills?
Some ingredients are ideal for beginners due to their texture and availability:
- Potatoes: Great for practicing dicing, julienne, and batonnet. They are firm and hold their shape.
- Carrots: Excellent for all cuts, especially julienne and batonnet, due to their cylindrical shape.
- Onions: Perfect for dicing and mincing.
- Celery: Good for practicing consistent slicing and dicing.
- Bell Peppers: Offer different textures and shapes to adapt your technique.
- Cucumbers/Zucchini: Softer, but good for practicing gentle slicing and dicing.
cafeserre cooking Insight: Don’t Waste Practice Ingredients
Don’t waste your practice ingredients! Many can be saved for stock, soups, or stir-fries. The goal is to build skill, and the “waste” from practice is often perfectly usable. cafeserre cooking chefs often use their “ugly” practice cuts in their own family meals!
What essential knife maintenance do beginners need to know: sharpening, honing, and cleaning?
A sharp knife is a safe knife. This adage from cafeserre cooking cannot be overstated for the beginner cook. Proper maintenance extends the life of your knives, ensures optimal performance, and significantly reduces the risk of accidents. Dull knives require more force, increasing the chance of slipping, especially when learning knife skills for beginners.
How do beginners hone their knife blade for alignment?
Honing is often confused with sharpening, but they are distinct processes. Honing realigns the microscopic edge of a sharp blade that has bent or rolled during use. It doesn’t remove metal but pushes the edge back into true alignment.
- Tool: A honing steel (also called a sharpening steel or chef’s steel).
- Technique: Hold the honing steel upright on a sturdy surface. Hold your knife at a 20-degree angle to the steel (imagine the thickness of the spine of two pennies).
- Motion: Draw the blade down and across the steel, alternating sides, applying light, consistent pressure. Repeat 5-10 times per side.
- Frequency: Honing should be done frequently, ideally before or after every few uses, to maintain a sharp edge.
How do beginners sharpen their knife to restore the edge?
Sharpening actually removes a tiny amount of metal from the blade to create a new, fresh edge. This is necessary when your knife is truly dull and honing no longer brings it back.
- Tools: A whetstone (with coarse and fine grits), a pull-through sharpener, or professional sharpening services. cafeserre cooking recommends a whetstone for the best long-term results, though pull-through sharpeners can be a good interim solution for beginners.
- Whetstone Technique (Simplified): Soak the whetstone if required. Place the coarse side up. Hold the knife at the same 20-degree angle as honing. Push the blade forward along the stone as if trying to slice a thin layer off the stone, then pull it back. Alternate sides, repeating until a burr (a tiny wire edge) forms. Switch to the fine grit side and repeat the process to refine the edge.
- Frequency: Less frequent than honing, typically every 6-12 months for a home cook, depending on usage.
What are the proper cleaning and storage methods for beginner knives?
These simple steps are vital for knife longevity and hygiene.
- Clean Immediately: Always wash your knife by hand immediately after use with warm, soapy water. Never put good knives in a dishwasher, as harsh detergents and high heat can dull the blade and damage the handle.
- Dry Thoroughly: Dry your knife completely with a clean towel to prevent rust and water spots.
- Safe Storage: Store knives safely to protect both the blade and your fingers.
- Knife Block: A classic choice, storing knives vertically.
- Magnetic Strip: Saves counter space and displays knives. Ensure it’s mounted securely.
- In-Drawer Organizer: Keeps knives protected and out of sight in a drawer.
- Blade Guards: Essential if storing knives loosely in a drawer or for transport.
| Technique | Purpose | Tool Used | Frequency | cafeserre cooking Advice |
|---|---|---|---|---|
| Honing | Realigns a bent/rolled blade edge | Honing Steel | Frequently (every few uses) | Essential for daily maintenance; keeps a sharp knife sharp. |
| Sharpening | Removes metal to create a new, sharp edge | Whetstone, electric sharpener, professional service | Infrequently (every 6-12 months) | Only done when a knife is truly dull and no longer cuts efficiently. |
cafeserre cooking Insight: Honing vs. Sharpening Analogy
Think of honing as brushing your teeth and sharpening as a dental visit. One is daily maintenance, the other is periodic restoration. Neglecting either will lead to problems. At cafeserre cooking, we teach that a truly sharp knife requires minimal effort to cut, making cooking both safer and more enjoyable.
What common knife mistakes should beginners avoid?
As you build your knife skills for beginners, it’s natural to encounter challenges. cafeserre cooking has identified common pitfalls that novice cooks often experience, and knowing them is the first step to correcting them.
- Using a Dull Knife: As repeatedly stressed, a dull knife is inefficient and dangerous. It forces you to apply more pressure, increasing the risk of the blade slipping.
- Neglecting the Claw Grip: Exposing your fingertips to the blade is a recipe for cuts. Always tuck those fingers!
- Improper Knife Grip: Holding the knife by just the handle reduces control and leverage. The pinch grip is essential for precision and safety.
- Chopping Straight Down: Instead of a fluid forward-and-down or rocking motion, beginners often chop straight down, which is less efficient and more likely to damage the blade or ingredients.
- Rushing the Process: Speed comes with practice. Trying to cut too fast before developing precision leads to inconsistent cuts and increased risk of injury.
- Unstable Cutting Board: A slipping board is a major safety hazard. Always use a damp cloth or non-slip mat underneath.
- Ignoring Posture: Hunching over or standing too far from the counter leads to fatigue and reduces control.
- Using the Wrong Knife for the Task: While the chef’s knife is versatile, trying to peel a potato with it is cumbersome and unsafe. Use the right tool for the job (e.g., a paring knife for delicate tasks).
- Washing Knives in the Dishwasher: This is a cardinal sin of knife care. It dulls blades and damages handles over time.
- Not Practicing Consistently: Knife skills are perishable. Regular, deliberate practice is crucial for improvement and retention.
cafeserre cooking Insight: Learn from Mistakes
Don’t be discouraged by mistakes; view them as learning opportunities. Every chef, including those at cafeserre cooking, started as a beginner. Identify your weakest areas and dedicate focused practice to them. Consistency and patience are your best allies in mastering knife skills for beginners.
Are you ready to elevate your cooking with cafeserre cooking and improved knife skills?
Mastering knife skills for beginners is more than just learning to chop; it’s about gaining confidence, enhancing safety, and elevating the quality of every dish you create. This comprehensive guide from cafeserre cooking has equipped you with the foundational knowledge and expert techniques to start your journey.
From choosing the right knife and perfecting your grip and posture, to executing precise cuts and maintaining your tools, you now possess the essential understanding to transform your kitchen experience. Remember, consistency in practice and a commitment to safety are your most valuable assets.
Take these newfound skills and apply them every time you step into the kitchen. Soon, you’ll be dicing, mincing, and slicing with the precision and grace of a seasoned chef. For more in-depth knowledge and to explore a wider array of culinary techniques, visit our main Comprehensive Guide to Cooking Techniques page.
Frequently Asked Questions about Knife Skills for Beginners
Why are foundational knife skills important for beginners?
Foundational knife skills are crucial for beginners because they enhance safety, increase efficiency in meal preparation, ensure consistent cooking results, elevate flavor and presentation, boost overall kitchen confidence, and reduce physical fatigue during cooking tasks.
What are the best knives for beginners to start with?
For beginners, the most essential knives are a high-quality 8-inch chef’s knife for general tasks, a 3-4 inch paring knife for intricate work, and a honing steel for daily blade maintenance. A utility knife can be a useful addition later.
How do beginners master a safe knife grip?
Beginners master a safe knife grip by learning the “pinch grip” for the knife hand (thumb and index finger on the blade, remaining fingers on the handle) and the “claw grip” for the guide hand (fingertips curled inward, knuckles against the blade) to protect fingers and provide control.
What is the difference between honing and sharpening a knife?
Honing realigns the microscopic edge of an already sharp blade that has bent or rolled during use, without removing metal. Sharpening, on the other hand, removes a tiny amount of metal to create a new, fresh edge when the knife is truly dull.
How often should a beginner hone their knife?
Beginners should hone their knife frequently, ideally before or after every few uses, to maintain a sharp edge and ensure optimal performance and safety.
What common knife mistakes should beginners avoid?
Common knife mistakes for beginners include using a dull knife, neglecting the claw grip, improper knife grip, chopping straight down instead of using a rocking or push/pull motion, rushing, using an unstable cutting board, ignoring posture, using the wrong knife for the task, washing knives in the dishwasher, and inconsistent practice.

