

How To Brew Chemex
How to Brew Chemex: The Ultimate Guide to a Flawless Pour-Over Experience
Affiliate disclosure: This article may contain affiliate links. Recommendations are independent and editorially driven.
For discerning coffee enthusiasts, the Chemex Coffeemaker stands as an icon of both design and function. Its elegant hourglass shape and pure glass construction are instantly recognizable, but beyond aesthetics, the Chemex offers a unique brewing experience that prioritizes clarity, sweetness, and a remarkably clean cup. If you’ve ever wondered how to brew Chemex to unlock its full potential, you’ve come to the right place. This comprehensive guide from the cafeserre team will walk you through every aspect of mastering this revered pour-over method, transforming your daily ritual into an art form.
The Chemex isn’t just another coffee maker; it’s a statement. It represents a commitment to quality, a pursuit of flavor nuance, and an appreciation for the ritual of preparation. While it might seem intimidating at first glance, the process of brewing with a Chemex is surprisingly straightforward once you understand the core principles. From selecting the right beans and perfecting your grind to mastering the pour and understanding critical variables, we’ll equip you with all the knowledge you need to consistently achieve an extraordinary brew.
Join us as we delve deep into the world of Chemex, exploring its history, the science behind its unique filters, and the precise techniques required to brew coffee that truly sings. Whether you’re a seasoned barista or a curious beginner, this guide will serve as your definitive resource on how to brew Chemex, ensuring every cup is a testament to purity and exceptional taste.
The Allure of Chemex: A Legacy of Purity and Design
The Chemex coffeemaker isn’t merely a brewing device; it’s a design masterpiece recognized by institutions like the Museum of Modern Art in New York. Its timeless form, combined with its functional brilliance, has captivated coffee lovers for decades. But what truly sets the Chemex apart, beyond its visual appeal, is its ability to produce an exceptionally clean, bright, and sweet cup of coffee.
A Brief History and Design Philosophy
Invented in 1941 by Dr. Peter Schlumbohm, a German chemist, the Chemex was designed with both scientific precision and artistic elegance in mind. Schlumbohm, known for his numerous inventions, sought to create a coffee brewing device that was both simple to use and capable of extracting the purest flavors from coffee beans. He famously said, “With the Chemex, even a moron can brew good coffee.” While perhaps a touch hyperbolic, his philosophy emphasized accessibility without compromising quality.
The design itself is a testament to functional modernism. Made from a single piece of heat-resistant borosilicate glass, its iconic hourglass shape serves several purposes: the top cone holds the filter and grounds, while the lower carafe collects the brewed coffee. The polished wood collar and leather tie not only provide a distinctive aesthetic but also serve as an insulated handle. The vent spout, another ingenious detail, allows air to escape during the brewing process, preventing vacuum lock and ensuring a smooth, consistent flow.
Schlumbohm’s background as a chemist informed every aspect of the Chemex. He understood the importance of contact time, temperature, and filtration, leading to the development of its uniquely thick, proprietary filter papers – a key component in achieving its signature clean taste. This blend of chemical engineering and minimalist design has cemented the Chemex’s place as both a functional brewing tool and a celebrated piece of industrial art.
The Distinctive Chemex Taste Profile
The magic of Chemex brewing lies primarily in its unique filtration system. Chemex filters are significantly thicker (20-30% thicker) than standard paper filters used in other pour-over methods. This extra thickness performs several crucial functions:
- Superior Sediment Removal: The dense fibers effectively trap even the finest coffee particles and oils, resulting in a remarkably clean cup free of grit and bitterness.
- Slowed Flow Rate: The thicker filter naturally slows down the flow of water through the coffee bed, extending the contact time between water and grounds. This allows for a more thorough and even extraction of soluble compounds.
- Clarity and Brightness: By removing most of the coffee oils and micro-fines, the Chemex accentuates the brighter, fruitier, and more acidic notes of the coffee, often revealing subtleties that might be masked by heavier body or sediment in other brewing methods.
The resulting cup is often described as “clean,” “bright,” “sweet,” and “tea-like” in its clarity. It’s a method that truly allows the intrinsic characteristics of the coffee bean to shine through, making it a favorite for showcasing high-quality, single-origin coffees with delicate flavor profiles. While some methods prioritize body or intensity, the Chemex excels in delivering an elegant, nuanced, and remarkably smooth drinking experience.
Essential Gear for the Perfect Chemex Brew
Before you can truly master how to brew Chemex, you need to assemble the right tools. While the basic Chemex coffeemaker is the star, several supporting players are crucial for achieving consistent, high-quality results. Think of them as the orchestra accompanying the soloist – each plays a vital role in the final harmony of your brew.
Choosing Your Chemex Coffeemaker
Chemex coffeemakers come in various sizes, typically measured in cups (though a “cup” in coffee terms often refers to 5 ounces, not 8). The most popular sizes are:
- 3-Cup: Ideal for a single serving or two small cups. Perfect for personal use.
- 6-Cup: The most versatile size, suitable for 2-4 people. A great starting point for most home brewers.
- 8-Cup: Good for small gatherings or those who drink a lot of coffee throughout the day.
- 10-Cup: The largest standard size, excellent for entertaining or multiple servings.
Beyond size, you’ll also find different handle options:
- Classic Series (Wood Collar): The iconic design with a polished wood collar and leather tie. Timeless and elegant.
- Glass Handle Series: Features an integrated glass handle, offering a more contemporary look and sometimes easier cleaning for some.
The choice between wood collar and glass handle is largely aesthetic and personal preference. Functionally, they perform identically.
The Crucial Role of Chemex Filters
As discussed, Chemex filters are non-negotiable for achieving the signature clean cup. They are thicker and more robust than standard paper filters. There are two main types:
- Bonded Square Filters: These are the most common and what most people picture when thinking of Chemex filters. They are folded into a cone shape.
- Bonded Circular Filters: These are pre-folded into a cone and are slightly easier for some to place.
Both types come in bleached (white) and unbleached (natural brown) varieties. While some argue that unbleached filters impart a slight paper taste, a thorough pre-rinse typically eliminates this. Bleached filters are often preferred for maximum flavor neutrality. Always use genuine Chemex filters; generic alternatives may not have the same thickness or porosity, leading to inferior results.
Precision Grinders: Burr vs. Blade
An excellent grinder is arguably the most critical piece of equipment after the Chemex itself. For pour-over methods like Chemex, a consistent grind size is paramount for even extraction.
- Burr Grinders (Recommended): These grinders crush coffee beans between two abrasive surfaces (burrs), resulting in a uniform particle size.
- Flat Burr: Two parallel burrs grind the coffee.
- Conical Burr: A cone-shaped central burr grinds against an outer ring. Both are excellent.
Burr grinders allow you to precisely dial in your grind setting, which is crucial for Chemex. They can be electric or manual (hand grinders). For Chemex, you’ll typically aim for a medium-coarse grind, resembling coarse sea salt.
- Blade Grinders (Not Recommended): These operate like blenders, chopping beans with spinning blades. They produce an inconsistent grind with a mix of very fine particles (fines) and large chunks. This inconsistency leads to uneven extraction, resulting in a bitter, over-extracted coffee combined with a sour, under-extracted coffee in the same brew. Avoid blade grinders for Chemex if you want quality results.
The Importance of a Gooseneck Kettle
While you can technically brew with any kettle, a gooseneck kettle is highly recommended for Chemex. Its long, slender spout allows for precise control over your water flow. This control is essential for:
- Even Saturation: You can direct the water precisely where you want it, ensuring all the coffee grounds are evenly saturated.
- Bloom Control: A gentle, controlled pour is key for the initial “bloom” phase.
- Maintaining the Coffee Bed: A steady, consistent pour prevents disturbing the coffee bed too much, which can lead to channeling and uneven extraction.
Electric gooseneck kettles with temperature control are even better, allowing you to set and maintain the exact desired brewing temperature.
Scales, Timers, and Thermometers: Your Brewing Toolkit
[INLINE IMAGE 1: place after second H2 | alt=”how to brew chemex concept illustration”]
Precision is key in coffee brewing, and these tools provide the accuracy you need:
- Digital Scale: Essential for measuring coffee grounds and water by weight. Measuring by volume (e.g., tablespoons) is notoriously inaccurate. A good scale allows you to adhere to precise coffee-to-water ratios, ensuring consistency. Look for one with at least 0.1-gram accuracy.
- Timer: Crucial for monitoring brew time, especially during the bloom and subsequent pours. Many scales come with an integrated timer.
- Thermometer: While not strictly mandatory if you have a temperature-controlled kettle, a thermometer ensures your water is at the optimal brewing temperature (typically between 195°F and 205°F / 90°C and 96°C).
Selecting Your Coffee Beans: A Foundation of Flavor
The quality of your coffee beans directly impacts the final taste. For Chemex, which highlights clarity, opt for fresh, high-quality, whole-bean coffee. Here are some tips:
- Freshness: Purchase beans that have been roasted recently, ideally within 2-3 weeks. Coffee begins to degas and lose flavor shortly after roasting.
- Whole Beans: Always buy whole beans and grind them just before brewing. Pre-ground coffee stales rapidly.
- Roast Level: While any roast can be brewed in a Chemex, light to medium roasts often shine brightest, allowing their inherent acidity and nuanced flavors to come through. Darker roasts can still be delicious but might lose some of their subtleties due to the Chemex’s clean profile.
- Origin: Experiment with different origins. African coffees (Ethiopia, Kenya) often present bright, fruity, and floral notes, which are spectacular in a Chemex. Central and South American coffees can offer balanced sweetness and chocolatey undertones.
With these essential pieces of equipment, you’re well on your way to mastering how to brew Chemex. Remember, investing in quality gear, especially a good grinder and scale, will dramatically improve your brewing consistency and the overall enjoyment of your coffee.
Mastering the Grind: The Heart of Extraction
Understanding and controlling your coffee grind size is one of the most critical factors in brewing an exceptional cup with a Chemex. It directly impacts the extraction rate, and therefore, the flavor profile of your final brew. Get this wrong, and even the finest beans and most precise technique won’t save your coffee.
Understanding Grind Size for Chemex
For Chemex, you’re aiming for a medium-coarse grind. Imagine something resembling coarse sea salt or large sugar crystals. It should be coarser than what you’d use for a drip coffee machine and significantly coarser than espresso grounds.
- Why medium-coarse? The Chemex filter, as we’ve discussed, is very thick. A grind that’s too fine will clog the filter, leading to an extremely slow drawdown, over-extraction, and a bitter, astringent cup. A grind that’s too coarse, on the other hand, allows water to pass through too quickly, leading to under-extraction, a weak body, and a sour, underdeveloped flavor.
- Consistency is Key: More important than the exact coarseness (which can vary slightly based on your specific beans and preference) is the consistency of the grind. A good burr grinder ensures uniform particle size, meaning water interacts with all coffee particles similarly, leading to even extraction. Inconsistent grinds (like those from a blade grinder) result in some particles being over-extracted and others under-extracted simultaneously, creating a muddy, unbalanced flavor.
Adjusting Your Grind: A Practical Guide
Dialing in your grind size is often a process of trial and error, but it’s a rewarding one. Here’s how to approach it:
- Start with a Baseline: Most burr grinders have settings. Begin with a medium-coarse setting. If your grinder has numbers, this might be around setting 20-25 on a Baratza Encore, for example, but always refer to your grinder’s manual and visual inspection.
- Observe the Brew Time:
- If your brew finishes too quickly (e.g., under 3 minutes for a 6-cup Chemex), your grind is likely too coarse. The water isn’t spending enough time with the coffee.
- If your brew takes too long (e.g., over 5-6 minutes for a 6-cup Chemex), your grind is likely too fine. It’s restricting water flow.
- Taste the Coffee:
- Sour, Weak, or Underextracted: If the coffee tastes thin, watery, excessively acidic (like unripe fruit), or lacks sweetness, your grind is probably too coarse. The water passed through too quickly, not extracting enough flavor compounds.
- Bitter, Astringent, or Overextracted: If the coffee tastes harsh, burnt, dry on the tongue, or overly bitter, your grind is likely too fine. The water extracted too many undesirable compounds, including bitterness.
- Balanced and Sweet: When you hit the sweet spot, the coffee will taste balanced, sweet, with clear flavor notes and a pleasant finish.
- Make Small Adjustments: Adjust your grinder by one small increment at a time. Grind a fresh batch, brew, and taste. Repeat until you achieve the desired flavor and brew time.
- Consider the Beans: Different beans, even from the same origin, can require slightly different grind settings. Denser beans might need a slightly finer grind, while lighter, more porous beans might need a coarser one. Always be prepared to adjust for a new bag of coffee.
Mastering the grind is an ongoing journey for any coffee enthusiast. By paying close attention to brew time and taste, you’ll develop an intuitive understanding of how to adjust your grind for consistently excellent Chemex brews. This precision is a cornerstone of learning how to brew Chemex at an expert level.
The Definitive Step-by-Step Guide: How to Brew Chemex to Perfection
Now that you have all your essential gear and understand the importance of grind size, it’s time to put it all together. This step-by-step guide will walk you through the precise process of how to brew Chemex, ensuring you achieve that signature clean, bright, and nuanced cup every time. We’ll assume a 6-cup Chemex for our example, yielding approximately two generous servings (around 500g of brewed coffee). Adjust coffee and water quantities proportionally for other sizes.
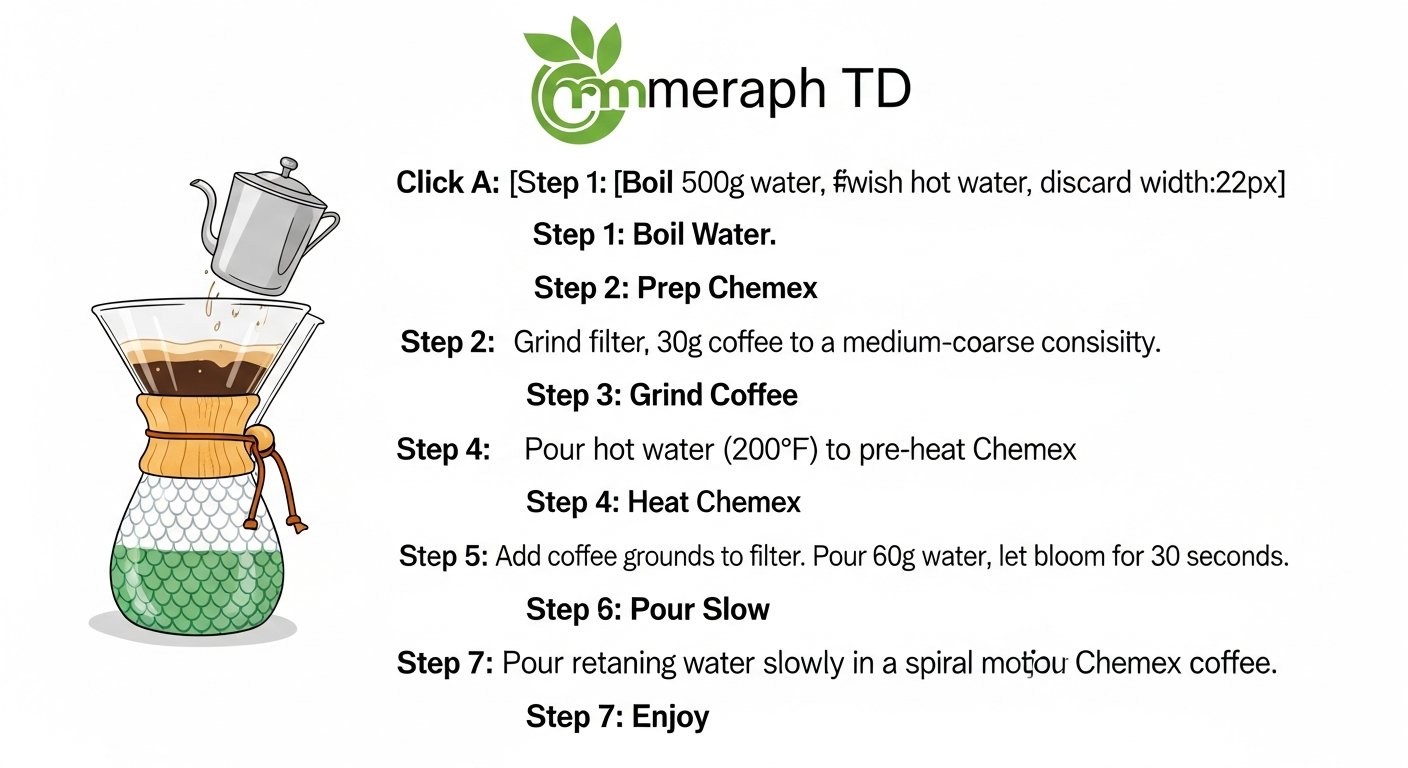
Step 1: Prepare Your Equipment
- Gather: Your Chemex, Chemex filter, digital scale, gooseneck kettle, thermometer (optional if kettle has temp control), timer, and fresh whole-bean coffee.
- Measure Coffee: Weigh out your whole coffee beans. For a 6-cup Chemex and a common 1:15 ratio, you’ll need approximately 33-35 grams of coffee. (500g water / 15 = 33.3g coffee).
- Grind Coffee: Grind your beans to a medium-coarse consistency, resembling coarse sea salt. Grind just before brewing for maximum freshness.
- Heat Water: Fill your gooseneck kettle with fresh, filtered water. Heat it to between 195°F and 205°F (90°C to 96°C). Aim for the higher end for lighter roasts and slightly lower for darker roasts. You’ll need about 500-550 grams of water (500g for brewing, plus a bit extra for rinsing the filter).
Step 2: Rinse the Filter
- Place Filter: Take a Chemex filter and open it into a cone. Place it in the top part of your Chemex coffeemaker with the triple-folded side facing the pour spout. This creates a small air channel, preventing vacuum lock during brewing.
- Rinse Thoroughly: Once your water reaches the target temperature, slowly and carefully pour hot water over the entire surface of the filter. Start from the center and spiral outwards, ensuring all paper is saturated. You should use about 100-150ml of water for this rinse.
- Discard Rinse Water: Carefully lift the filter slightly (holding the triple-fold side away from the spout) and pour out the rinse water from the Chemex carafe. This pre-heats the Chemex, removes any papery taste from the filter, and ensures your brew starts at the correct temperature. Place the filter back correctly.
Step 3: Add Your Coffee Grounds
- Transfer Grounds: Carefully pour your pre-weighed, freshly ground coffee into the rinsed filter. Gently shake the Chemex to level the coffee bed, creating a flat surface.
- Tare Scale: Place the Chemex with the filter and grounds on your digital scale and tare it to zero. This will allow you to precisely measure your water additions.
Step 4: The Bloom (Pre-Infusion)
- Start Timer & First Pour: Start your timer immediately after you begin this pour. Slowly and evenly pour about 60-70 grams (around twice the weight of your coffee grounds) of hot water over the coffee bed. Ensure all grounds are saturated, avoiding pouring directly down the center onto dry spots.
- Observe and Wait: The coffee grounds will “bloom” – expanding and releasing trapped carbon dioxide. This process, called degassing, indicates freshness and prepares the grounds for even extraction. Let it bloom for 30-45 seconds. This is a critical step in how to brew Chemex properly, as it minimizes sourness and enhances sweetness.
Step 5: The Pour-Over Technique
[INLINE IMAGE 2: place after fourth H2 | alt=”how to brew chemex comparison illustration”]
After the bloom, it’s time for the main pours. The goal is to maintain a consistent water level and even saturation throughout the coffee bed.
- First Main Pour: Begin pouring hot water in a slow, steady, concentric spiral, starting from the center and moving outwards, then spiraling back towards the center. Avoid pouring directly onto the filter paper walls; focus on the coffee bed itself. Pour until your scale reads around 200-250 grams (total cumulative weight).
- Allow to Draw Down (Partially): Let the water level drop slightly, but don’t let the coffee bed completely dry out. This is usually around the 1:30 to 2:00 minute mark on your timer.
- Second Main Pour: Repeat the slow, spiral pouring motion. Continue pouring until your scale reads approximately 350-400 grams. Again, let the water draw down slightly.
- Final Pour: Perform your last pour, again in a controlled spiral, until you reach your target water weight (e.g., 500 grams total for 33.3g coffee).
Key Pacing for Pours: The total brewing time should be approximately 4 to 4.5 minutes for a 6-cup Chemex. If it’s too fast, your grind is too coarse; if too slow, it’s too fine. Adjust accordingly in future brews.
Step 6: The Drawdown and Completion
- Full Drawdown: Once you’ve completed your final pour, allow all the water to fully drain through the coffee bed into the lower carafe. The coffee bed should look flat and evenly extracted when done.
- Remove Filter: Once all the water has passed through, carefully lift and discard the filter with the spent grounds. Avoid squeezing the filter, as this can release bitter compounds.
Step 7: Serve and Savor
- Swirl: Give the Chemex carafe a gentle swirl. This mixes the layers of coffee that have brewed at different rates, ensuring a consistent flavor throughout.
- Serve: Pour your freshly brewed coffee into your favorite pre-heated mug.
- Enjoy: Take a moment to appreciate the aroma and taste the clean, bright, and nuanced flavors you’ve meticulously crafted.
Learning how to brew Chemex is a journey of refinement. Don’t get discouraged if your first few attempts aren’t perfect. With practice, attention to detail, and a willingness to adjust, you’ll soon be consistently brewing coffee that truly showcases the elegant potential of the Chemex.
For more detailed brewing insights and advanced techniques, consider exploring our comprehensive guide to pour-over coffee methods.
Variables That Define Your Brew: Water, Ratio, and Temperature
Beyond the step-by-step instructions, truly mastering how to brew Chemex involves understanding and controlling the key variables that influence extraction. Each element – water quality, coffee-to-water ratio, water temperature, and total brew time – plays a critical role in shaping the final taste of your coffee. Fine-tuning these can elevate your brew from good to extraordinary.
Water Quality: The Unsung Hero
Coffee is over 98% water, so it stands to reason that the quality of your water profoundly impacts the taste of your brew. Using the wrong water can completely mask delicate flavors or introduce off-notes.
- Filtered Water: Always use filtered water. Tap water often contains chlorine, sediment, and minerals that can impart undesirable flavors. A simple Brita filter or an under-sink filtration system is usually sufficient.
- Mineral Content: Water isn’t just H2O; it contains dissolved minerals that contribute to flavor extraction. Too few minerals (distilled or reverse osmosis water) can lead to flat, underdeveloped coffee because there’s nothing for the coffee solids to bind to. Too many minerals (very hard water) can cause over-extraction and scale buildup in your kettle.
- Optimal Water: Aim for water with a total dissolved solids (TDS) content between 75-150 ppm (parts per million) and a pH close to neutral (7.0). Many bottled spring waters fall within this range, or you can use filtered tap water that’s been optimized with mineral packets designed for coffee brewing (e.g., Third Wave Water).
The Golden Ratio: Coffee to Water
The coffee-to-water ratio is fundamental to achieving a balanced strength and flavor. It’s often expressed as a ratio of coffee mass to water mass (e.g., 1:15, 1:16, 1:17). While personal preference plays a role, there are widely accepted guidelines:
- Standard Starting Point: A common and excellent starting point for Chemex is a 1:15 to 1:16 ratio.
- For example, if you use 30 grams of coffee, you would use 450 grams (ml) of water for a 1:15 ratio, or 480 grams (ml) for a 1:16 ratio.
- Adjusting the Ratio:
- Stronger Coffee: Use a lower ratio (e.g., 1:14). This means more coffee per gram of water. Be cautious not to go too low, as it can lead to over-extraction and bitterness.
- Lighter Coffee: Use a higher ratio (e.g., 1:17). This means less coffee per gram of water. Too high a ratio can result in a weak, watery cup.
Using a digital scale to precisely measure both coffee and water by weight is non-negotiable for consistent results. Volume measurements are simply too inaccurate.
Optimal Water Temperature
Water temperature directly affects the efficiency and speed of extraction. Brewing too hot can scald the coffee, leading to bitterness and flat flavors. Brewing too cold results in under-extraction, leading to sourness and a weak body.
- Recommended Range: The ideal brewing temperature for Chemex is typically between 195°F and 205°F (90°C and 96°C).
- Just Off Boil: If you don’t have a temperature-controlled kettle, bringing your water to a boil and then letting it sit off the heat for 30-60 seconds will usually bring it into this range.
- Temperature Control: An electric gooseneck kettle with precise temperature settings is an invaluable tool for hitting and maintaining the perfect temperature consistently.
- Adjusting for Roast: Some baristas prefer slightly cooler temperatures (e.g., 195°F / 90°C) for darker roasts to prevent over-extraction of bitter compounds and slightly hotter temperatures (e.g., 205°F / 96°C) for lighter roasts to ensure full extraction of their complex flavors.
Total Brew Time: A Balancing Act
Total brew time is the duration from the start of your first pour (the bloom) to when all the water has completely drained through the coffee bed. It’s an indicator of whether your grind size and pouring technique are correct.
- Target Brew Time (for 6-cup Chemex / 500g water): Aim for a total brew time of 3.5 to 4.5 minutes.
- Too Fast (Under 3.5 minutes): Indicates your grind is too coarse, or your pouring is too aggressive. Result: Under-extracted, sour, weak coffee.
- Too Slow (Over 4.5 minutes): Indicates your grind is too fine, or you’re pouring too slowly, causing clogging. Result: Over-extracted, bitter, astringent coffee.
- Adjusting for Brew Time:
- If too fast, make your grind slightly finer.
- If too slow, make your grind slightly coarser.
By consciously controlling these variables, you move beyond simply following instructions and truly begin to understand the craft of how to brew Chemex. Each adjustment offers an opportunity to refine and personalize your coffee experience, bringing you closer to your ideal cup.
For further reading on coffee characteristics, visit our article on understanding coffee bean origins and flavor profiles.
Troubleshooting Common Chemex Brewing Issues
Even with the best equipment and a solid understanding of how to brew Chemex, you might occasionally encounter issues that lead to less-than-perfect results. Don’t worry; troubleshooting is a normal part of the brewing journey. Most problems can be traced back to one of the core variables we’ve discussed. Here’s a guide to diagnosing and fixing common Chemex woes.
My Coffee Tastes Weak or Sour
A weak or sour taste is a classic sign of under-extraction. This means that not enough of the desirable flavors and compounds were dissolved from the coffee grounds into the water.
- Possible Causes:
- Grind is too coarse: Water passes through too quickly, insufficient contact time.
- Water temperature is too low: Water isn’t hot enough to efficiently extract flavors.
- Brew time is too short: Not enough time for extraction.
- Coffee-to-water ratio is too high: Too much water for the amount of coffee.
- Uneven wetting: Not all grounds were properly saturated during the bloom or pours.
- Stale coffee beans: Old beans have lost much of their soluble material.
- Solutions:
- Finer Grind: Adjust your grinder to a slightly finer setting. This increases surface area and slows down flow.
- Increase Water Temperature: Ensure your water is consistently in the 195-205°F (90-96°C) range.
- Extend Brew Time: If your grind is correct, ensure your pours are controlled and gentle to achieve the target 3.5-4.5 minute total brew time.
- Adjust Ratio: Use slightly more coffee or less water (e.g., move from 1:17 to 1:16 or 1:15).
- Improve Bloom/Pour: Ensure all grounds are thoroughly saturated during the bloom and subsequent pours, circling evenly.
- Fresh Beans: Use freshly roasted coffee, ideally within 2-3 weeks of the roast date.
My Coffee Tastes Bitter or Over-Extracted
Bitterness, often accompanied by an astringent (drying) sensation on the tongue, indicates over-extraction. This means you’ve dissolved too many undesirable compounds from the coffee grounds.
- Possible Causes:
- Grind is too fine: Water flow is restricted, leading to excessive contact time.
- Water temperature is too high: Extracts bitter compounds too aggressively.
- Brew time is too long: Coffee grounds are exposed to water for too long.
- Coffee-to-water ratio is too low: Too much coffee for the amount of water, leading to over-saturation of dissolved solids.
- Aggressive pouring: Disturbing the coffee bed too much can lead to fines migrating and clogging, causing over-extraction.
- Solutions:
- Coarser Grind: Adjust your grinder to a slightly coarser setting. This will speed up the flow.
- Lower Water Temperature: Aim for the lower end of the 195-205°F (90-96°C) range, or let the water cool for a few more seconds off the boil.
- Reduce Brew Time: Adjust grind to ensure you hit the target 3.5-4.5 minute range.
- Adjust Ratio: Use slightly less coffee or more water (e.g., move from 1:14 to 1:15 or 1:16).
- Gentler Pours: Be mindful of maintaining a consistent, gentle pour to avoid agitating the coffee bed.
The Brew is Taking Too Long (or Too Short)
Brew time is a strong indicator of grind size and pour consistency.
- Brew Too Long (clogging, slow drawdown):
- Cause: Grind is too fine, creating too much resistance. Or, excessive fines were generated by a poor grinder, clogging the filter.
- Solution: Coarsen your grind. Check your grinder for consistency. Ensure you’re not pouring too much water at once, which can compact the coffee bed.
- Brew Too Short (fast drawdown):
- Cause: Grind is too coarse, allowing water to rush through.
- Solution: Fine your grind. Ensure your pours are steady and controlled, allowing sufficient contact time.
Uneven Extraction: Why it Happens
Uneven extraction leads to a cup that tastes both weak/sour (from under-extracted parts) and bitter/astringent (from over-extracted parts). It’s a sign of inconsistent water flow through the coffee bed.
- Possible Causes:
- Uneven grind: Some particles are too fine, others too coarse.
- Poor bloom: Not all grounds were saturated initially.
- Tunneling/Channeling: Water finds paths of least resistance, bypassing large sections of the coffee bed. Often caused by aggressive pouring or an uneven coffee bed.
- Pouring directly on the filter walls: Water bypasses the coffee entirely.
- Dirty Chemex: Residual oils or buildup can affect flow.
- Solutions:
- Better Grinder: Invest in a quality burr grinder for uniform particles.
- Thorough Bloom: Ensure all grounds are saturated during the bloom. Use a gentle stir if necessary (but be careful not to over-agitate).
- Controlled Pours: Use a gooseneck kettle. Pour slowly and evenly in concentric circles, focusing on the coffee bed and avoiding the edges of the filter. Keep the coffee bed level.
- Level Bed: Gently shake the Chemex after adding grounds to create a flat bed.
- Clean Equipment: Regularly clean your Chemex and kettle.
By systematically addressing these common issues, you’ll gain a deeper understanding of the brewing process and become more adept at consistently brewing exceptional Chemex coffee. Remember that brewing is a continuous learning process, and each “failed” brew is an opportunity to learn and improve.
Elevating Your Chemex Experience: Advanced Tips and Customization
Once you’ve mastered the fundamentals of how to brew Chemex, you can begin to experiment and fine-tune your technique to truly personalize your coffee. These advanced tips and customization options allow you to explore the full spectrum of flavors your Chemex can produce.
Pre-Infusion Techniques Beyond the Bloom
The standard bloom is essential, but you can iterate on it for even better results:
- The “Aggressive” Bloom (for dense, fresh beans): For very fresh, dense, or lightly roasted beans that degas heavily, a slightly more agitated bloom might be beneficial. After the initial bloom pour, you can gently stir the coffee bed with a spoon or chopstick for 5-10 seconds to ensure all grounds are thoroughly wet. This can lead to a more even extraction, but use caution as over-stirring can create fines and lead to clogging.
- Longer Bloom Times: While 30-45 seconds is standard, some recipes for very fresh or dense beans advocate for a slightly longer bloom, up to 60 seconds. This allows more CO2 to escape, potentially leading to a cleaner final cup. Experiment with increments of 10-15 seconds to see how it affects your specific beans.
Experimenting with Different Pour Patterns
How to Brew Chemex: The Ultimate Guide to a Flawless Pour-Over Experience
Affiliate disclosure: This article may contain affiliate links. Recommendations are independent and editorially driven.
For discerning coffee enthusiasts, the Chemex Coffeemaker stands as an icon of both design and function. Its elegant hourglass shape and pure glass construction are instantly recognizable, but beyond aesthetics, the Chemex offers a unique brewing experience that prioritizes clarity, sweetness, and a remarkably clean cup. If you’ve ever wondered how to brew Chemex to unlock its full potential, you’ve come to the right place. This comprehensive guide from the cafeserre team will walk you through every aspect of mastering this revered pour-over method, transforming your daily ritual into an art form.
The Chemex isn’t just another coffee maker; it’s a statement. It represents a commitment to quality, a pursuit of flavor nuance, and an appreciation for the ritual of preparation. While it might seem intimidating at first glance, the process of brewing with a Chemex is surprisingly straightforward once you understand the core principles. From selecting the right beans and perfecting your grind to mastering the pour and understanding critical variables, we’ll equip you with all the knowledge you need to consistently achieve an extraordinary brew.
Join us as we delve deep into the world of Chemex, exploring its history, the science behind its unique filters, and the precise techniques required to brew coffee that truly sings. Whether you’re a seasoned barista or a curious beginner, this guide will serve as your definitive resource on how to brew Chemex, ensuring every cup is a testament to purity and exceptional taste.
The Allure of Chemex: A Legacy of Purity and Design
The Chemex coffeemaker isn’t merely a brewing device; it’s a design masterpiece recognized by institutions like the Museum of Modern Art in New York. Its timeless form, combined with its functional brilliance, has captivated coffee lovers for decades. But what truly sets the Chemex apart, beyond its visual appeal, is its ability to produce an exceptionally clean, bright, and sweet cup of coffee.
A Brief History and Design Philosophy
Invented in 1941 by Dr. Peter Schlumbohm, a German chemist, the Chemex was designed with both scientific precision and artistic elegance in mind. Schlumbohm, known for his numerous inventions, sought to create a coffee brewing device that was both simple to use and capable of extracting the purest flavors from coffee beans. He famously said, “With the Chemex, even a moron can brew good coffee.” While perhaps a touch hyperbolic, his philosophy emphasized accessibility without compromising quality.
The design itself is a testament to functional modernism. Made from a single piece of heat-resistant borosilicate glass, its iconic hourglass shape serves several purposes: the top cone holds the filter and grounds, while the lower carafe collects the brewed coffee. The polished wood collar and leather tie not only provide a distinctive aesthetic but also serve as an insulated handle. The vent spout, another ingenious detail, allows air to escape during the brewing process, preventing vacuum lock and ensuring a smooth, consistent flow.
Schlumbohm’s background as a chemist informed every aspect of the Chemex. He understood the importance of contact time, temperature, and filtration, leading to the development of its uniquely thick, proprietary filter papers – a key component in achieving its signature clean taste. This blend of chemical engineering and minimalist design has cemented the Chemex’s place as both a functional brewing tool and a celebrated piece of industrial art.
The Distinctive Chemex Taste Profile
The magic of Chemex brewing lies primarily in its unique filtration system. Chemex filters are significantly thicker (20-30% thicker) than standard paper filters used in other pour-over methods. This extra thickness performs several crucial functions:
- Superior Sediment Removal: The dense fibers effectively trap even the finest coffee particles and oils, resulting in a remarkably clean cup free of grit and bitterness.
- Slowed Flow Rate: The thicker filter naturally slows down the flow of water through the coffee bed, extending the contact time between water and grounds. This allows for a more thorough and even extraction of soluble compounds.
- Clarity and Brightness: By removing most of the coffee oils and micro-fines, the Chemex accentuates the brighter, fruitier, and more acidic notes of the coffee, often revealing subtleties that might be masked by heavier body or sediment in other brewing methods.
The resulting cup is often described as “clean,” “bright,” “sweet,” and “tea-like” in its clarity. It’s a method that truly allows the intrinsic characteristics of the coffee bean to shine through, making it a favorite for showcasing high-quality, single-origin coffees with delicate flavor profiles. While some methods prioritize body or intensity, the Chemex excels in delivering an elegant, nuanced, and remarkably smooth drinking experience.
Essential Gear for the Perfect Chemex Brew
Before you can truly master how to brew Chemex, you need to assemble the right tools. While the basic Chemex coffeemaker is the star, several supporting players are crucial for achieving consistent, high-quality results. Think of them as the orchestra accompanying the soloist – each plays a vital role in the final harmony of your brew.
Choosing Your Chemex Coffeemaker
Chemex coffeemakers come in various sizes, typically measured in cups (though a “cup” in coffee terms often refers to 5 ounces, not 8). The most popular sizes are:
- 3-Cup: Ideal for a single serving or two small cups. Perfect for personal use.
- 6-Cup: The most versatile size, suitable for 2-4 people. A great starting point for most home brewers.
- 8-Cup: Good for small gatherings or those who drink a lot of coffee throughout the day.
- 10-Cup: The largest standard size, excellent for entertaining or multiple servings.
Beyond size, you’ll also find different handle options:
- Classic Series (Wood Collar): The iconic design with a polished wood collar and leather tie. Timeless and elegant.
- Glass Handle Series: Features an integrated glass handle, offering a more contemporary look and sometimes easier cleaning for some.
The choice between wood collar and glass handle is largely aesthetic and personal preference. Functionally, they perform identically.
The Crucial Role of Chemex Filters
As discussed, Chemex filters are non-negotiable for achieving the signature clean cup. They are thicker and more robust than standard paper filters. There are two main types:
- Bonded Square Filters: These are the most common and what most people picture when thinking of Chemex filters. They are folded into a cone shape.
- Bonded Circular Filters: These are pre-folded into a cone and are slightly easier for some to place.
Both types come in bleached (white) and unbleached (natural brown) varieties. While some argue that unbleached filters impart a slight paper taste, a thorough pre-rinse typically eliminates this. Bleached filters are often preferred for maximum flavor neutrality. Always use genuine Chemex filters; generic alternatives may not have the same thickness or porosity, leading to inferior results.
Precision Grinders: Burr vs. Blade
An excellent grinder is arguably the most critical piece of equipment after the Chemex itself. For pour-over methods like Chemex, a consistent grind size is paramount for even extraction.
- Burr Grinders (Recommended): These grinders crush coffee beans between two abrasive surfaces (burrs), resulting in a uniform particle size.
- Flat Burr: Two parallel burrs grind the coffee.
- Conical Burr: A cone-shaped central burr grinds against an outer ring. Both are excellent.
Burr grinders allow you to precisely dial in your grind setting, which is crucial for Chemex. They can be electric or manual (hand grinders). For Chemex, you’ll typically aim for a medium-coarse grind, resembling coarse sea salt.
- Blade Grinders (Not Recommended): These operate like blenders, chopping beans with spinning blades. They produce an inconsistent grind with a mix of very fine particles (fines) and large chunks. This inconsistency leads to uneven extraction, resulting in a bitter, over-extracted coffee combined with a sour, under-extracted coffee in the same brew. Avoid blade grinders for Chemex if you want quality results.
The Importance of a Gooseneck Kettle
While you can technically brew with any kettle, a gooseneck kettle is highly recommended for Chemex. Its long, slender spout allows for precise control over your water flow. This control is essential for:
- Even Saturation: You can direct the water precisely where you want it, ensuring all the coffee grounds are evenly saturated.
- Bloom Control: A gentle, controlled pour is key for the initial “bloom” phase.
- Maintaining the Coffee Bed: A steady, consistent pour prevents disturbing the coffee bed too much, which can lead to channeling and uneven extraction.
Electric gooseneck kettles with temperature control are even better, allowing you to set and maintain the exact desired brewing temperature.
Scales, Timers, and Thermometers: Your Brewing Toolkit
[INLINE IMAGE 1: place after second H2 | alt=”how to brew chemex concept illustration”]
Precision is key in coffee brewing, and these tools provide the accuracy you need:
- Digital Scale: Essential for measuring coffee grounds and water by weight. Measuring by volume (e.g., tablespoons) is notoriously inaccurate. A good scale allows you to adhere to precise coffee-to-water ratios, ensuring consistency. Look for one with at least 0.1-gram accuracy.
- Timer: Crucial for monitoring brew time, especially during the bloom and subsequent pours. Many scales come with an integrated timer.
- Thermometer: While not strictly mandatory if you have a temperature-controlled kettle, a thermometer ensures your water is at the optimal brewing temperature (typically between 195°F and 205°F / 90°C and 96°C).
Selecting Your Coffee Beans: A Foundation of Flavor
The quality of your coffee beans directly impacts the final taste. For Chemex, which highlights clarity, opt for fresh, high-quality, whole-bean coffee. Here are some tips:
- Freshness: Purchase beans that have been roasted recently, ideally within 2-3 weeks. Coffee begins to degas and lose flavor shortly after roasting.
- Whole Beans: Always buy whole beans and grind them just before brewing. Pre-ground coffee stales rapidly.
- Roast Level: While any roast can be brewed in a Chemex, light to medium roasts often shine brightest, allowing their inherent acidity and nuanced flavors to come through. Darker roasts can still be delicious but might lose some of their subtleties due to the Chemex’s clean profile.
- Origin: Experiment with different origins. African coffees (Ethiopia, Kenya) often present bright, fruity, and floral notes, which are spectacular in a Chemex. Central and South American coffees can offer balanced sweetness and chocolatey undertones.
With these essential pieces of equipment, you’re well on your way to mastering how to brew Chemex. Remember, investing in quality gear, especially a good grinder and scale, will dramatically improve your brewing consistency and the overall enjoyment of your coffee.
Mastering the Grind: The Heart of Extraction
Understanding and controlling your coffee grind size is one of the most critical factors in brewing an exceptional cup with a Chemex. It directly impacts the extraction rate, and therefore, the flavor profile of your final brew. Get this wrong, and even the finest beans and most precise technique won’t save your coffee.
Understanding Grind Size for Chemex
For Chemex, you’re aiming for a medium-coarse grind. Imagine something resembling coarse sea salt or large sugar crystals. It should be coarser than what you’d use for a drip coffee machine and significantly coarser than espresso grounds.
- Why medium-coarse? The Chemex filter, as we’ve discussed, is very thick. A grind that’s too fine will clog the filter, leading to an extremely slow drawdown, over-extraction, and a bitter, astringent cup. A grind that’s too coarse, on the other hand, allows water to pass through too quickly, leading to under-extraction, a weak body, and a sour, underdeveloped flavor.
- Consistency is Key: More important than the exact coarseness (which can vary slightly based on your specific beans and preference) is the consistency of the grind. A good burr grinder ensures uniform particle size, meaning water interacts with all coffee particles similarly, leading to even extraction. Inconsistent grinds (like those from a blade grinder) result in some particles being over-extracted and others under-extracted simultaneously, creating a muddy, unbalanced flavor.
Adjusting Your Grind: A Practical Guide
Dialing in your grind size is often a process of trial and error, but it’s a rewarding one. Here’s how to approach it:
- Start with a Baseline: Most burr grinders have settings. Begin with a medium-coarse setting. If your grinder has numbers, this might be around setting 20-25 on a Baratza Encore, for example, but always refer to your grinder’s manual and visual inspection.
- Observe the Brew Time:
- If your brew finishes too quickly (e.g., under 3 minutes for a 6-cup Chemex), your grind is likely too coarse. The water isn’t spending enough time with the coffee.
- If your brew takes too long (e.g., over 5-6 minutes for a 6-cup Chemex), your grind is likely too fine. It’s restricting water flow.
- Taste the Coffee:
- Sour, Weak, or Underextracted: If the coffee tastes thin, watery, excessively acidic (like unripe fruit), or lacks sweetness, your grind is probably too coarse. The water passed through too quickly, not extracting enough flavor compounds.
- Bitter, Astringent, or Overextracted: If the coffee tastes harsh, burnt, dry on the tongue, or overly bitter, your grind is likely too fine. The water extracted too many undesirable compounds, including bitterness.
- Balanced and Sweet: When you hit the sweet spot, the coffee will taste balanced, sweet, with clear flavor notes and a pleasant finish.
- Make Small Adjustments: Adjust your grinder by one small increment at a time. Grind a fresh batch, brew, and taste. Repeat until you achieve the desired flavor and brew time.
- Consider the Beans: Different beans, even from the same origin, can require slightly different grind settings. Denser beans might need a slightly finer grind, while lighter, more porous beans might need a coarser one. Always be prepared to adjust for a new bag of coffee.
Mastering the grind is an ongoing journey for any coffee enthusiast. By paying close attention to brew time and taste, you’ll develop an intuitive understanding of how to adjust your grind for consistently excellent Chemex brews. This precision is a cornerstone of learning how to brew Chemex at an expert level.
The Definitive Step-by-Step Guide: How to Brew Chemex to Perfection
Now that you have all your essential gear and understand the importance of grind size, it’s time to put it all together. This step-by-step guide will walk you through the precise process of how to brew Chemex, ensuring you achieve that signature clean, bright, and nuanced cup every time. We’ll assume a 6-cup Chemex for our example, yielding approximately two generous servings (around 500g of brewed coffee). Adjust coffee and water quantities proportionally for other sizes.
Step 1: Prepare Your Equipment
- Gather: Your Chemex, Chemex filter, digital scale, gooseneck kettle, thermometer (optional if kettle has temp control), timer, and fresh whole-bean coffee.
- Measure Coffee: Weigh out your whole coffee beans. For a 6-cup Chemex and a common 1:15 ratio, you’ll need approximately 33-35 grams of coffee. (500g water / 15 = 33.3g coffee).
- Grind Coffee: Grind your beans to a medium-coarse consistency, resembling coarse sea salt. Grind just before brewing for maximum freshness.
- Heat Water: Fill your gooseneck kettle with fresh, filtered water. Heat it to between 195°F and 205°F (90°C to 96°C). Aim for the higher end for lighter roasts and slightly lower for darker roasts. You’ll need about 500-550 grams of water (500g for brewing, plus a bit extra for rinsing the filter).
Step 2: Rinse the Filter
- Place Filter: Take a Chemex filter and open it into a cone. Place it in the top part of your Chemex coffeemaker with the triple-folded side facing the pour spout. This creates a small air channel, preventing vacuum lock during brewing.
- Rinse Thoroughly: Once your water reaches the target temperature, slowly and carefully pour hot water over the entire surface of the filter. Start from the center and spiral outwards, ensuring all paper is saturated. You should use about 100-150ml of water for this rinse.
- Discard Rinse Water: Carefully lift the filter slightly (holding the triple-fold side away from the spout) and pour out the rinse water from the Chemex carafe. This pre-heats the Chemex, removes any papery taste from the filter, and ensures your brew starts at the correct temperature. Place the filter back correctly.
Step 3: Add Your Coffee Grounds
- Transfer Grounds: Carefully pour your pre-weighed, freshly ground coffee into the rinsed filter. Gently shake the Chemex to level the coffee bed, creating a flat surface.
- Tare Scale: Place the Chemex with the filter and grounds on your digital scale and tare it to zero. This will allow you to precisely measure your water additions.
Step 4: The Bloom (Pre-Infusion)
- Start Timer & First Pour: Start your timer immediately after you begin this pour. Slowly and evenly pour about 60-70 grams (around twice the weight of your coffee grounds) of hot water over the coffee bed. Ensure all grounds are saturated, avoiding pouring directly down the center onto dry spots.
- Observe and Wait: The coffee grounds will “bloom” – expanding and releasing trapped carbon dioxide. This process, called degassing, indicates freshness and prepares the grounds for even extraction. Let it bloom for 30-45 seconds. This is a critical step in how to brew Chemex properly, as it minimizes sourness and enhances sweetness.
Step 5: The Pour-Over Technique
[INLINE IMAGE 2: place after fourth H2 | alt=”how to brew chemex comparison illustration”]
After the bloom, it’s time for the main pours. The goal is to maintain a consistent water level and even saturation throughout the coffee bed.
- First Main Pour: Begin pouring hot water in a slow, steady, concentric spiral, starting from the center and moving outwards, then spiraling back towards the center. Avoid pouring directly onto the filter paper walls; focus on the coffee bed itself. Pour until your scale reads around 200-250 grams (total cumulative weight).
- Allow to Draw Down (Partially): Let the water level drop slightly, but don’t let the coffee bed completely dry out. This is usually around the 1:30 to 2:00 minute mark on your timer.
- Second Main Pour: Repeat the slow, spiral pouring motion. Continue pouring until your scale reads approximately 350-400 grams. Again, let the water draw down slightly.
- Final Pour: Perform your last pour, again in a controlled spiral, until you reach your target water weight (e.g., 500 grams total for 33.3g coffee).
Key Pacing for Pours: The total brewing time should be approximately 4 to 4.5 minutes for a 6-cup Chemex. If it’s too fast, your grind is too coarse; if too slow, it’s too fine. Adjust accordingly in future brews.
Step 6: The Drawdown and Completion
- Full Drawdown: Once you’ve completed your final pour, allow all the water to fully drain through the coffee bed into the lower carafe. The coffee bed should look flat and evenly extracted when done.
- Remove Filter: Once all the water has passed through, carefully lift and discard the filter with the spent grounds. Avoid squeezing the filter, as this can release bitter compounds.
Step 7: Serve and Savor
- Swirl: Give the Chemex carafe a gentle swirl. This mixes the layers of coffee that have brewed at different rates, ensuring a consistent flavor throughout.
- Serve: Pour your freshly brewed coffee into your favorite pre-heated mug.
- Enjoy: Take a moment to appreciate the aroma and taste the clean, bright, and nuanced flavors you’ve meticulously crafted.
Learning how to brew Chemex is a journey of refinement. Don’t get discouraged if your first few attempts aren’t perfect. With practice, attention to detail, and a willingness to adjust, you’ll soon be consistently brewing coffee that truly showcases the elegant potential of the Chemex.
For more detailed brewing insights and advanced techniques, consider exploring our comprehensive guide to pour-over coffee methods.
Variables That Define Your Brew: Water, Ratio, and Temperature
Beyond the step-by-step instructions, truly mastering how to brew Chemex involves understanding and controlling the key variables that influence extraction. Each element – water quality, coffee-to-water ratio, water temperature, and total brew time – plays a critical role in shaping the final taste of your coffee. Fine-tuning these can elevate your brew from good to extraordinary.
Water Quality: The Unsung Hero
Coffee is over 98% water, so it stands to reason that the quality of your water profoundly impacts the taste of your brew. Using the wrong water can completely mask delicate flavors or introduce off-notes.
- Filtered Water: Always use filtered water. Tap water often contains chlorine, sediment, and minerals that can impart undesirable flavors. A simple Brita filter or an under-sink filtration system is usually sufficient.
- Mineral Content: Water isn’t just H2O; it contains dissolved minerals that contribute to flavor extraction. Too few minerals (distilled or reverse osmosis water) can lead to flat, underdeveloped coffee because there’s nothing for the coffee solids to bind to. Too many minerals (very hard water) can cause over-extraction and scale buildup in your kettle.
- Optimal Water: Aim for water with a total dissolved solids (TDS) content between 75-150 ppm (parts per million) and a pH close to neutral (7.0). Many bottled spring waters fall within this range, or you can use filtered tap water that’s been optimized with mineral packets designed for coffee brewing (e.g., Third Wave Water).
The Golden Ratio: Coffee to Water
The coffee-to-water ratio is fundamental to achieving a balanced strength and flavor. It’s often expressed as a ratio of coffee mass to water mass (e.g., 1:15, 1:16, 1:17). While personal preference plays a role, there are widely accepted guidelines:
- Standard Starting Point: A common and excellent starting point for Chemex is a 1:15 to 1:16 ratio.
- For example, if you use 30 grams of coffee, you would use 450 grams (ml) of water for a 1:15 ratio, or 480 grams (ml) for a 1:16 ratio.
- Adjusting the Ratio:
- Stronger Coffee: Use a lower ratio (e.g., 1:14). This means more coffee per gram of water. Be cautious not to go too low, as it can lead to over-extraction and bitterness.
- Lighter Coffee: Use a higher ratio (e.g., 1:17). This means less coffee per gram of water. Too high a ratio can result in a weak, watery cup.
Using a digital scale to precisely measure both coffee and water by weight is non-negotiable for consistent results. Volume measurements are simply too inaccurate.
Optimal Water Temperature
Water temperature directly affects the efficiency and speed of extraction. Brewing too hot can scald the coffee, leading to bitterness and flat flavors. Brewing too cold results in under-extraction, leading to sourness and a weak body.
- Recommended Range: The ideal brewing temperature for Chemex is typically between 195°F and 205°F (90°C and 96°C).
- Just Off Boil: If you don’t have a temperature-controlled kettle, bringing your water to a boil and then letting it sit off the heat for 30-60 seconds will usually bring it into this range.
- Temperature Control: An electric gooseneck kettle with precise temperature settings is an invaluable tool for hitting and maintaining the perfect temperature consistently.
- Adjusting for Roast: Some baristas prefer slightly cooler temperatures (e.g., 195°F / 90°C) for darker roasts to prevent over-extraction of bitter compounds and slightly hotter temperatures (e.g., 205°F / 96°C) for lighter roasts to ensure full extraction of their complex flavors.
Total Brew Time: A Balancing Act
Total brew time is the duration from the start of your first pour (the bloom) to when all the water has completely drained through the coffee bed. It’s an indicator of whether your grind size and pouring technique are correct.
- Target Brew Time (for 6-cup Chemex / 500g water): Aim for a total brew time of 3.5 to 4.5 minutes.
- Too Fast (Under 3.5 minutes): Indicates your grind is too coarse, or your pouring is too aggressive. Result: Under-extracted, sour, weak coffee.
- Too Slow (Over 4.5 minutes): Indicates your grind is too fine, or you’re pouring too slowly, causing clogging. Result: Over-extracted, bitter, astringent coffee.
- Adjusting for Brew Time:
- If too fast, make your grind slightly finer.
- If too slow, make your grind slightly coarser.
By consciously controlling these variables, you move beyond simply following instructions and truly begin to understand the craft of how to brew Chemex. Each adjustment offers an opportunity to refine and personalize your coffee experience, bringing you closer to your ideal cup.
For further reading on coffee characteristics, visit our article on understanding coffee bean origins and flavor profiles.
Troubleshooting Common Chemex Brewing Issues
Even with the best equipment and a solid understanding of how to brew Chemex, you might occasionally encounter issues that lead to less-than-perfect results. Don’t worry; troubleshooting is a normal part of the brewing journey. Most problems can be traced back to one of the core variables we’ve discussed. Here’s a guide to diagnosing and fixing common Chemex woes.
My Coffee Tastes Weak or Sour
A weak or sour taste is a classic sign of under-extraction. This means that not enough of the desirable flavors and compounds were dissolved from the coffee grounds into the water.
- Possible Causes:
- Grind is too coarse: Water passes through too quickly, insufficient contact time.
- Water temperature is too low: Water isn’t hot enough to efficiently extract flavors.
- Brew time is too short: Not enough time for extraction.
- Coffee-to-water ratio is too high: Too much water for the amount of coffee.
- Uneven wetting: Not all grounds were properly saturated during the bloom or pours.
- Stale coffee beans: Old beans have lost much of their soluble material.
- Solutions:
- Finer Grind: Adjust your grinder to a slightly finer setting. This increases surface area and slows down flow.
- Increase Water Temperature: Ensure your water is consistently in the 195-205°F (90-96°C) range.
- Extend Brew Time: If your grind is correct, ensure your pours are controlled and gentle to achieve the target 3.5-4.5 minute total brew time.
- Adjust Ratio: Use slightly more coffee or less water (e.g., move from 1:17 to 1:16 or 1:15).
- Improve Bloom/Pour: Ensure all grounds are thoroughly saturated during the bloom and subsequent pours, circling evenly.
- Fresh Beans: Use freshly roasted coffee, ideally within 2-3 weeks of the roast date.
My Coffee Tastes Bitter or Over-Extracted
Bitterness, often accompanied by an astringent (drying) sensation on the tongue, indicates over-extraction. This means you’ve dissolved too many undesirable compounds from the coffee grounds.
- Possible Causes:
- Grind is too fine: Water flow is restricted, leading to excessive contact time.
- Water temperature is too high: Extracts bitter compounds too aggressively.
- Brew time is too long: Coffee grounds are exposed to water for too long.
- Coffee-to-water ratio is too low: Too much coffee for the amount of water, leading to over-saturation of dissolved solids.
- Aggressive pouring: Disturbing the coffee bed too much can lead to fines migrating and clogging, causing over-extraction.
- Solutions:
- Coarser Grind: Adjust your grinder to a slightly coarser setting. This will speed up the flow.
- Lower Water Temperature: Aim for the lower end of the 195-205°F (90-96°C) range, or let the water cool for a few more seconds off the boil.
- Reduce Brew Time: Adjust grind to ensure you hit the target 3.5-4.5 minute range.
- Adjust Ratio: Use slightly less coffee or more water (e.g., move from 1:14 to 1:15 or 1:16).
- Gentler Pours: Be mindful of maintaining a consistent, gentle pour to avoid agitating the coffee bed.
The Brew is Taking Too Long (or Too Short)
Brew time is a strong indicator of grind size and pour consistency.
- Brew Too Long (clogging, slow drawdown):
- Cause: Grind is too fine, creating too much resistance. Or, excessive fines were generated by a poor grinder, clogging the filter.
- Solution: Coarsen your grind. Check your grinder for consistency. Ensure you’re not pouring too much water at once, which can compact the coffee bed.
- Brew Too Short (fast drawdown):
- Cause: Grind is too coarse, allowing water to rush through.
- Solution: Fine your grind. Ensure your pours are steady and controlled, allowing sufficient contact time.
Uneven Extraction: Why it Happens
Uneven extraction leads to a cup that tastes both weak/sour (from under-extracted parts) and bitter/astringent (from over-extracted parts). It’s a sign of inconsistent water flow through the coffee bed.
- Possible Causes:
- Uneven grind: Some particles are too fine, others too coarse.
- Poor bloom: Not all grounds were saturated initially.
- Tunneling/Channeling: Water finds paths of least resistance, bypassing large sections of the coffee bed. Often caused by aggressive pouring or an uneven coffee bed.
- Pouring directly on the filter walls: Water bypasses the coffee entirely.
- Dirty Chemex: Residual oils or buildup can affect flow.
- Solutions:
- Better Grinder: Invest in a quality burr grinder for uniform particles.
- Thorough Bloom: Ensure all grounds are saturated during the bloom. Use a gentle stir if necessary (but be careful not to over-agitate).
- Controlled Pours: Use a gooseneck kettle. Pour slowly and evenly in concentric circles, focusing on the coffee bed and avoiding the edges of the filter. Keep the coffee bed level.
- Level Bed: Gently shake the Chemex after adding grounds to create a flat bed.
- Clean Equipment: Regularly clean your Chemex and kettle.
By systematically addressing these common issues, you’ll gain a deeper understanding of the brewing process and become more adept at consistently brewing exceptional Chemex coffee. Remember that brewing is a continuous learning process, and each “failed” brew is an opportunity to learn and improve.
Elevating Your Chemex Experience: Advanced Tips and Customization
Once you’ve mastered the fundamentals of how to brew Chemex, you can begin to experiment and fine-tune your technique to truly personalize your coffee. These advanced tips and customization options allow you to explore the full spectrum of flavors your Chemex can produce.
Pre-Infusion Techniques Beyond the Bloom
The standard bloom is essential, but you can iterate on it for even better results:
- The “Aggressive” Bloom (for dense, fresh beans): For very fresh, dense, or lightly roasted beans that degas heavily, a slightly more agitated bloom might be beneficial. After the initial bloom pour, you can gently stir the coffee bed with a spoon or chopstick for 5-10 seconds to ensure all grounds are thoroughly wet. This can lead to a more even extraction, but use caution as over-stirring can create fines and lead to clogging.
- Longer Bloom Times: While 30-45 seconds is standard, some recipes for very fresh or dense beans advocate for a slightly longer bloom, up to 60 seconds. This allows more CO2 to escape, potentially leading to a cleaner final cup. Experiment with increments of 10-15 seconds to see how it affects your specific beans.

